

Writing GUI Applications in Perl/Tk
“This article originally appeared in Visual Developer Magazine”
Perl is officially known as the “Practical Extraction and Report Language,” in part because of its extremely robust text handling abilities. Perl’s author, Larry Wall, has a much more colorful name for the language: the “Pathologically Eclectic Rubbage Lister.” Many people are aware of Perl’s role in the Web, specifically as an easy-to-use text processing language for writing CGI scripts. What many people don’t realize, however, is that Perl is a powerful general purpose programming language that can be used to do general-purpose development– including cross-platform GUI development with the Tk tool kit originally developed for the Tcl programming language under Unix. An important advantage of using the pTk (Perl/Tk) combination is that you can write truly portable cross-platform GUI applications– applications that will work similarly across Win32, Macintosh, Linux, and even the AS/400!
In this article, I will introduce the basics of installing the Perl interpreter for Win32 and writing a visual application using the Tk (toolkit) modules. This system is geared toward the Win32 and Linux developers; however, most of the information presented pertains to other operating systems as well.
A Point-of-Sale Terminal in pTk
My expertise lies in electronic commerce. So when I decided to write this article, I naturally looked around to see what might be useful to others using the pTk system. One project I’ve worked on recently is integrating the PaymentNet credit-card processing client software into various applications. I decided that it would be great to have a system that could do all my credit-card processing from my local PC, for testing as well as for real e-commerce. So I created a pTk Point-of-Sale (POS) terminal program to do so. For many merchants, it is less expensive (and faster) to use the Internet to process their credit card (or check) transactions than to purchase additional software or terminals.
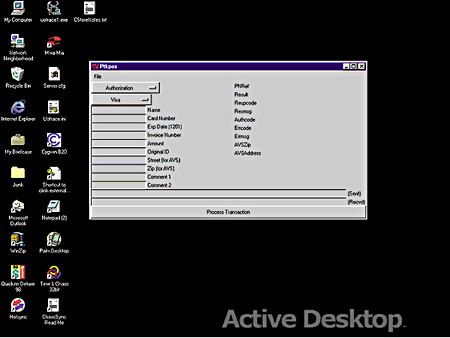 |
| Figure 1: The terminal under Windows 95. |
The example system uses a simulated credit-card authorization module that does nothing except verify that the transaction could be a valid one. Real transactions can be implemented quite easily; I’ll show you how at the end of the article. Of course, the code works with any pTk system. You can see it running under both Windows 95 (Figure 1) and Linux (Figure 2).
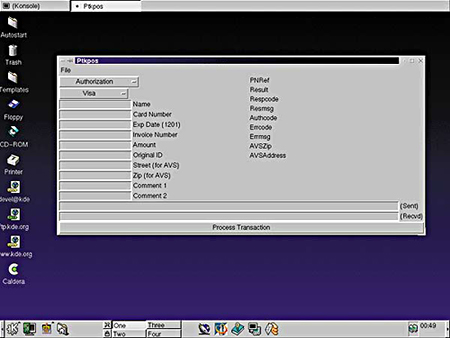 |
| Figure 2: The terminal under Linux. |
We will cover a lot of ground very quickly in this article, and of necessity, will gloss over quite a few very important points. Perl comes with some of the best documentation available in the form of POD (plain old documentation) files, and a search/viewing program called perldoc. Whenever you get stuck, chances are the answer to your questions will be right on your local computer. For now, you can find more information by typing perldoc perldoc from the command line– once Perl is installed, of course! I’ll remind you of this a couple of times.
First, we’ll need to install both Perl and the Tk libraries. If you are using Linux, this will mean compiling the libraries as well, though that is not at all difficult. Then we’ll look at what it takes to make a pTk program: program flow, geometry management, event and variable bindings, and the event loop. I’ll then do a brief walk through the code, showing examples of various widget (object) use within the system. You should then be well on your way to being an expert pTk programmer!
Installing ActiveState Perl for Win32
To install the latest version of Perl for Win32, go to the ActiveState download page (www.activestate.com/Active-Perl/download.htm). For Windows 98 and Windows NT, there are no special instructions; download the latest version (APi517e.exe as of this writing), and run the self-installer by double clicking on the file. For Windows95, however, you need to make sure that you have DCOM installed (it’s already installed on Win98 and NT machines). The DCOM files and installation instructions are available from the Microsoft’s Web site at www.microsoft.com/com/dcom/dcom95/dcom1_3.asp.
Installing the Perl/Tk Modules with Perl Package Manager
ActiveState extended the standard CPAN modules (Comprehensive Perl Archive, which we will discuss shortly) with its own Perl Package Manager (PPM). The package manager makes installing and configuring the modules extremely easy. Note that the primary difference (other than user interface) between Perl’s standard CPAN module and the PPM is that CPAN deals exclusively with source code, requiring that you compile and install both Perl and the relevant modules from a source code distribution. ActiveStates’ package manager, on the other hand, deals with pre-compiled modules that install on the host platform without compiling.
Assuming your Perl has been installed properly, you should now be able to go to the DOS command prompt and run the Perl Package Manager by typing PPM. You can get summary help information by typing “PPM -h”. To use the PPM, you must be connected to the Internet. More PPM documentation can be found at www.activestate.com/ppm. You can also (as always) type “perldoc PPM” to get the documentation that comes with the module distribution.
To download and install a single package, just type “install tk” from the PPM prompt. Be aware that the Tk module, a complete GUI development environment for Perl, is pretty big. The zip file on which the package is based is over 2MB in size, so the download can take a while, especially over a standard modem. Go ahead and install Tk, as it is required for the rest of this project. Also, if you have an older ActiveState Perl distribution (Perl5.004 or earlier), I suggest upgrading to the latest install now. If you don’t, the example program may not run. Specifically, you will need Data::Dumper installed, which you can load by typing “install Data-Dumper” from the PPM prompt, if you don’t already have it.
Installing Perl and Tk Under Linux
One of Perl’s great strengths is that there are hundreds of individual modules available for the language. All current builds of Perl come with a module-manager to be used with the Comprehensive Perl Archive Network (CPAN). Currently, CPAN lists over 260MB of source code! Windows users can also use CPAN if they’ve taken the time to compile their own version of Perl, rather than using ActiveState’s binary distribution.
For my Linux desktop, I use the K Desktop Environment (KDE) that comes with the Caldera Open Linux 2.2 distribution. To run the system, make sure that you have both Perl and the gcc development environment installed. The following minimal packages are needed to install and run the system:
- Perl
- egcs
- glibc
- Xfree86-devel (For X-Windows header files)
To verify that the packages are installed (or to install them if they aren’t):
- Make sure that the Open Linux CD is in the drive.
- Log in as “root”.
- Click on the icon that looks like a house, labeled “Caldera Open Administration System” (COAS).
- Select “Software”.
- When the window comes up, select “Workstation | Administration | Software”.
- Make sure that “kpackage” is checked.
This will install the K package manager if it isn’t already installed. Now click “K | Utilities”, and then select “kpackage”. The kpackage tree structure is a little easier to use and provides more information than the COAS, though they both manage distribution packages. If you are missing one of the packages above, simply select new from within the kpackage tree, select the package you want to install, and then click “examine” in the bottom right panel. A new dialog will pop up, allowing you to install the selected package.
Installing and Building Tk Using CPAN
To install and build the Tk libraries and Perl interface, it is necessary to execute the CPAN module. Open a command window (while still logged in as root), and execute the following command:
perl -MCPAN -e shell;
Perl will load the module CPAN (-MCPAN), and execute (-e) the shell subroutine contained in the module. If this is your first time executing the script, it will ask you configuration questions. If you are unsure of the answers, just hit Enter. In most cases, the defaults are appropriate for your system. Eventually, you will be dropped into a “cpan>” prompt. At this point, you can type “h” for help, or go directly to the next step. To finish configuration, there are a few optional modules you should install just to make things a little easier. (If you are on a slow connection, you might want to skip installing the optional modules steps.)
Install Internet communications modules (optional):
cpan> install Bundle::libnet
Upgrade CPAN (optional):
install Bundle::CPAN
reload CPAN
Now, build and install Tk:
install Tk
This should download, build, and install the Tk packages from the Internet. It’s not really any more difficult from using the PPM; however, CPAN does require that a C compiler be installed, which isn’t the norm for Windows users.
Now that both Perl and Tk have been installed in your development environment, spend some time exploring the system. The toolkit comes with a few extremely useful example programs. A simple text editor called ptked is available, as well as ptksh (a GUI shell where you can experiment creating forms and other controls directly within the pTK environment, which is reminiscent of the BASIC command line interface). The widget program is a comprehensive demonstration and testing shell for– you guessed it– widget exploration. It’s a really fun tool to play with, one that can get you into programming with pTk very quickly. These utilities are available on all systems with pTk installed.
pTk Core Concepts
To understand a pTk program, we need to explore a few core concepts regarding the system design. In particular, you need to be familiar with the structure of the program, the way objects (widgets) are laid out on the screen (geometry management), the way communication is handled (variable and event binding), and the pTk event loop.
All pTk programs are assembled in pretty much the same way:
Create a main window, which is also known as the top-level window. Build a group of widgets (Unix-speak for controls), and arrange them inside the main window. In Perl, a widget is simply an object that contains data and methods to create some visible element of the user interface. Start the event loop. Events are then fired, and handled by the widgets and associated code.
Geometry Management
In a fashion similar to Java, Tk has a notion of “geometry management,” which is a fancy way of saying that the software wants to decide where to put your controls for you. Basically, you define the widget, and then tell the system about where you’d like it to go (top, bottom, etc.), and it takes care of sizing and placing the widget for you. We will use the “packer” and “grid” exclusively; however, others are available for different layouts. Since each frame can have its own geometry manager, extremely sophisticated placement schemes can be created using this system.
I’ve used the grid() manager to divide the example application into four frames: $filemenu (at the top), $left, $right, and $bottom. The grid manager works like HTML tables: you can specify the row and column for each widget, as well as a columnspan and rowspan, if necessary. The “sticky” option tells the manager where to “attach” the widget, the options being north, south, east, west in any combination. Specifying all four will center your widget within its frame.
my $left  =
 $mainwindow->Frame->grid(-row => 0, -col => 0, -sticky => 'nw');
Keep in mind that a widget won’t be displayed until its geometry manager is called. This can be useful to keep controls hidden until you’re ready to use them; however, it can also be a source of errors. If you have created a widget but can’t see it on the screen, chances are you’ve forgotten to set its manager.
Binding Variables
Variable binding is one of the most frequently used data input/output mechanisms available to pTk programs. The concept is relatively simple: a variable is bound to a control, and when the state of that control changes, the variable is updated to reflect the new state. The reverse is true as well: changing the state of the variables within the program automagically updates the associated controls. You can see examples of this throughout the source code. Note how saveConfig just dumps the state of the $config hash, and loadConfig does the opposite; the NoteBook control is updated to reflect the state changes without additional work. This is usually accomplished by passing the -variable or -textvariable option to the widget, as well as a reference to the scalar variable you want bound:
$left->Optionmenu (-options => \@trxtype,
   -variable => \$trans->{TRXTYPE} )->pack();
This statement binds the variable $trans->{TRXTYPE} to a select box. Whenever you update the transaction type on the program, the variable changes to reflect the change. Note that the geometry manager (pack() in this case), is called to place the widget on its associated frame and to make it visible. This is a pattern that you will use quite a bit throughout pTk programming, and is central to the event model.
Binding Events
Most action widgets have an optional parameter, “command,” that allows you to specify the function that should be called whenever this widget is acted upon in some way. This is a reference to a callback function that will be called when the widget receives an action event-button click, scrollbar release, etc.
$bottom->Button(-text => 'Process Transaction',
        -command => \&processTransaction )
        ->grid(qw/-row 2 -column 0 -sticky nesw/);
In this case, the processTransaction function is called whenever the button is pressed. For most standard programs, this is the extent of the event management required, when combined with tied variables described in the previous section.
It is also possible to bind additional events to subroutines by using the bind() call. The general format for doing so is:
$widget->bind(event, subroutine);
When an event related to your widget fires, the subroutine that has been bound to the command is called. Possible bound events include key clicks and releases, mouse motion, and window resizing. More information can be found using perldoc Tk:bind.
The Event Loop
Once everything is set up, the only thing left to do is call MainLoop() from within the program. This goes into an endless loop, dispatching events from the underlying operating system to your applications and updating appropriate bound variables.
MainLoop(); # never returns
Just as in the pre-Win32 days when we used the cooperative multitasking of Windows 3.1 and text-based frameworks like Turbo Vision and other non-multitasking systems, you must break up any CPU-intensive tasks into manageable chunks by using the after() or repeat() method of most widgets, which are timers used to schedule events. Other methods may work equally well.
This time-slicing problem crops up when doing a real transaction over the Internet. The system seems to “freeze” for a few seconds while processing the data, as the call to do so blocks until the data has been received. Unfortunately, this is normal behavior as the current release version of Perl is not yet threaded. However, the newest development version of Perl does incorporate a threaded architecture, so you can expect this limitation to be removed shortly. I noticed that the Perl shipped with the Caldera Open Linux 2.2 distribution has been compiled multi-threaded, though I haven’t tried using the new threading features yet.
Creating the Application
Dozens of widgets are available for use in your programs. For our application, I only used a few: filemenu, Optionmenu (a drop-down select box), LabEntry (a text box with related label), and NoteBook, for the configuration control.
If you look through the source code, you will see the general outline of the way things are done in most pTk applications. First, I declare all the global structures that I will use. This is important, as they will need to be within the scope of the callback routines used. (See Listing 1.) I then declare a MAIN block for the program. (See Listing 2.) Within the main program, we first create the main window ($mainwindow). Every widget will attach (at some level) to this window:
$mainwindow = MainWindow->new();
Nothing fancy here. It’s best to keep your handle in a global variable, as most of the program will need access to it.
Creating the MenuBar
We then create a frame for the menu bar. A frame keeps parts of the program together logically, and for geometry management, lays out your controls on the screen. If you’ve used Java, the concept will be familiar. Before a widget can be seen on the screen, you must call a manager to lay it out for you. Each frame can only have one type of manager for its widgets; however, each frame can have multiple frames, making possible quite complex schemes.
The $menubar consists of a single menu button, $filemenu. Of course, more are possible in larger applications. Attached to $filemenu are the commands you will see in the drop-downs, each specifying the label and a command (that is, a bound subroutine.) Additional options within the menu bar widget allow you to attach colors, checkboxes, and hotkeys to the menu items, as well.
Menus under pTk are lists of actions with associated commands, usually contained within a frame. First, you need to create the menu bar frame:
$menubar =
 $mainwindow->Frame()->pack(-side => 'top', -fill => 'x');
After creating the frame, we’ll add one button to it:
my $filemenu = $menubar->Menubutton(-text => 'File');
Multiple top-level items would be added the same way. Now we need to add a few commands to the menu:
$filemenu->command( -label  => 'Open Config',
                 -command => \&loadConfig );
$filemenu->command( -label  => 'Save Config',
                 -command => \&saveConfig );
$filemenu->separator();
$filemenu->command(-label  => 'Configuration...',
                 -command => \&doConfig );
$filemenu->separator();
$filemenu->command(-label => 'Exit', -command => sub {exit;} );
Note the way commands are bound to the widgets. Whenever a user selects an item, the bound command is executed.
Building the Main Window
Within the main window, I’ve added three additional frames in addition to the menu bar: one on the left, for data input; one on the right, for data output; and the third on the bottom for status lines and the “Process Transaction” buttons.
my $left  = $mainwindow->Frame->grid(-row => 1,
                    -col => 0,
                    -sticky => 'nw');
my $right = $mainwindow->Frame->grid(-row => 1,
                    -col => 1,
                    -sticky => 'nw');
my $bottom = $mainwindow->Frame->grid(-row => 2,
                    -col => 0,
                    -columnspan => 3,
                    -sticky => 'nw');
The left frame is first populated with a drop-down list (called an Optionmenu), with the various transaction types available:
$left->Optionmenu(
        -options => \@trxtype,
        -variable => \$trans->{TRXTYPE},
        )->pack(-side => "top", -anchor => "nw");
The -options parameter is a reference to an array (defined globally; refer to Listing 1) of accepted transaction types. We’ve seen this before when talking about bound variables. Remember that the variable $trans->{TRXTYPE} will always reflect the state of the Optionmenu, and we can change the current selected item programmatically by simply reassigning a value to the bound variable. We also create an Optionmenu for the card-type; however, it isn’t used in the current implementation. The card type can be determined from the actual card number, so isn’t really required except that users are used to having it available.
We then populate the rest of the frame with LabEntry widgets. These little gizmos are fantastic, housing commonly used labels, entry fields, and bound variables in one convenient widget.
$left->LabEntry(-label => "Name",
   -labelPack => [-side => "right", -anchor => "w"],
   -width => 20,
   -textvariable => \$trans->{_NAME})->pack(-side => "top",
   -anchor => 'nw');
Like every other widget, you must call the geometry manager to make it visible. It is also pretty obvious that the LabEntry widget is calling its own geometry manager behind the scenes for us.
The right-hand frame is populated with a series of Label widgets for displaying the output of the transaction. Note the grid manager used to place the labels in a column. I’ve also made sure to bind the second Label in each row to a variable, to be used for updating the state of the transaction later.
$right->Label(-text => 'PNRef')->
        grid(-row => 0, -column => 0,-sticky => 'nw');
$right->Label(-textvariable => \$results->{PNREF})->
        grid(-row => 0, -column => 1,-sticky => 'nw');
The bottom frame is no more complicated, and consists of only three widgets: two LabEntry widgets for showing the state of the transaction (both sent and received) and a button to actually perform the processing.
$bottom->Button(-text => 'Process Transaction',
         -command => \&processTransaction )->
         grid(qw/-row 2 -column 0 -sticky nesw/);
The button is bound to the processTransaction routine, which is straightforward. (See Listing 3.) The only thing left to do is to start the event processing, which should look familiar by this time:
MainLoop(); # Start the event processing
Saving and Loading the Configuration
The system binds “File | Open Config” and “File | Save Config” to the loadConfig() and saveConfig() subroutines, respectively. To configure the file dialog boxes, each routine needs a list of the file types to accept:
my @types = (["Config Files", '.pcg', 'TEXT'],
       ["All Files", "*"] );
This creates the standard “Save As” dialog box. (See Figure 1.) You can add as many file types as you’d like. To actually execute the dialog, simply call getSaveFile:
my $file = $mainwindow->getSaveFile(-filetypes => \@types,
      -initialfile=> 'Default',
      -defaultextension => '.pcg');
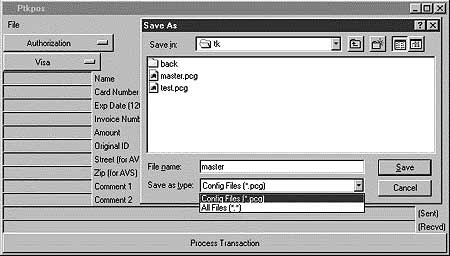 |
| Figure 3: The Save As dialog. |
You can specify the initial file name for the dialog, as shown above. The name of the file the user selected is returned, or an undef value if the “cancel” button was pressed. If the file exists, a second confirmation dialog (“Are you sure you want to overwrite?”) is executed. Only if the user answers affirmatively will the filename be returned. Using the Open dialog is similar, just call getOpenFile instead of getSaveFile.
Once we have the filename, we can then save and load the configuration. We are using an extremely simple file format, basically a mini-Perl program, thanks to the Data::Dumper module. This is where the interpreted nature of Perl shines. To write out the file, we open it, print the text provided by Dumper, and then close it. Reading it back in is simple as well. Slurp up the file, and then use the eval function to interpret the file. Be aware that this format stores all configuration information in plain text on the user’s drive, so it may not be suitable for use in an open environment.
The Configuration Dialog
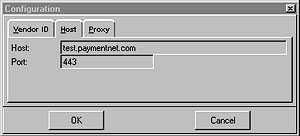 |
| Figure 4: The Configuration dialog |
One really cool widget in the pTk system is the NoteBook (see Figure 4). I’ve used it to implement the simple configuration dialog bound to the “File | Configuration” menu item. The doConfig() callback subroutine actually implements the system. The strategy is to create a structure ($config) to hold all the relevant information. Within doConfig, we first copy this structure to a local structure, so that changes won’t be saved if the user selects “Cancel” when editing the fields. To create the actual dialog, we ask $mainwindow to do it for us:
$f = $mainwindow->DialogBox(-title => "Configuration",
              -buttons => ["OK", "Cancel"]);
To add the NoteBook widget to the DialogBox (which is really just a fancy Frame), use:
$n = $f->add('NoteBook', -ipadx=>6, -ipady => 6)
The -ipad options tell the system how much internal padding to leave around the widgets contained within the box. To actually use the NoteBook, you must now add pages to it:
my $vendor_p = $n->add("vendor",
         -label => "Vendor ID", -underline => 0);
my $host_p  = $n->add("host",
         -label => "Host", -underline => 0);
my $proxy_p = $n->add("proxy",
         -label => "Proxy", -underline => 0);
This adds our three pages, named “vendor,” “host,” and “proxy.” You can treat each page as a regular frame within your dialog. The rest of the method’s code sets up the entry boxes we need:
$host_p->LabEntry(-label => "Port:       ",
         -labelPack => [-side => "left",
         -anchor => "w"],
         -width => 20,
         -textvariable =>
         \$localconfig->{PORT})->pack(-side => "top",
         -anchor => "nw");
Again, we use the LabEntry widget to make a labeled text-entry box. To execute the dialog, once it’s set up, is a one liner:
$return = $f->show;
The return value is the text of the button that the user pressed to end the dialog. If the result matches, we can then copy our temporary variables back to the $config array, effectively updating our configuration.
Using the System
That just about covers the example program, which is available electronically in the listings archive for this issue. To run the program under Windows, double-click on the file name (ptkpos.pl) from Windows Explorer. The ActiveState installation program for Windows associates the .pl extension to Perl by default and runs the Perl interpreter when you double click on a .pl file. Under Linux, you first need to make the program executable.
chmod +x ptkpos.pl
You can then use the K file manager and click on the program, or execute it from the command line directly.
Live Online Credit Card Authorizations
The virtual terminal presented here is using a “stub” simulation module to do credit-card authorizations. This module simulates the transaction process by providing data that you could expect to receive if you were to send the data to a real validation system. The simulator is very basic: It does no checking on vendor ID / password, card expiration date or even ensuring that all required information is available. It does, however, check to see if the credit card could be a valid card: if so, it returns an authorization code, otherwise it will be declined. Any simulator declines any transaction type other than an “authorization” or a “sale.”
To use the application for real transactions, you must replace the stub with an active link to a real online gateway system. The program will automatically detect a file named call_pfpro.pl, re-evaluate it to replace the simulator, and transactions will then go to a real gateway.
To configure the system, select File | Configuration from the menu bar. Fill in the User and Password fields as provided by PaymentNet, or leave it blank to use the simulator. For testing, leave test.paymentnet.com in the Host entry. Port 443 is the default and should never need to be changed. If you are processing transactions from behind a firewall (always a good idea when doing electronic commerce) you need to set the Proxy settings. Consult the PaymentNet documentation for full details on how to do this.
The application supports only a limited subset of the PaymentNet system. In particular, PaymentNet supports various forms of check processing. It should be possible to support other payment gateways relatively easily, though doing so is not currently planned.
You can find more information (as well as the payment-transaction module) on how to do so at the Commerce-Store.com Web site, www.commercestore.com/developers/VDM.
Further Exploration
We’ve looked at the pTk event model, a couple of the more common widgets, and as well as a slice of Internet-enabled electronic commerce. As Internet access becomes more common, tools that access the Net from a desktop can inexpensively replace more traditional systems, like leased-line or dial up credit-card terminals, as we’ve done here.
There are quite a few exploration tools available for both Perl and pTk. I encourage you to take a look at some of the Web sites presented here, as well as the example programs that come with the distribution.
Nick Temple is an entrepreneur who has recently relocated to Silicon Valley to pursue the startup dream. The founder of The Temple Group, Ltd. and CommerceStore.com, he welcomes open discussion directed to ntemple@commercestore.com.
Additional information not part of original article:
Since the article was written, a number of things have changed in the online payments world. PaymentNet has changed their name to Signio, and then purchased by Verisign. You may know them now as Verisign Payment Services. Here are instructions for “upgrading” the pTkPOS system presented in the article to handle live Internet transactions. Here are the steps that you will need to follow:
- Download and install the source code to the article
- Click here to register with Signio for a test account. It is free, and can be converted to a live account at a later date, if you so choose. This may take up to an hour to activate. <plug> Note that CommerceStore.com (my company) is a reseller for Verisign Payment Services, so if you wish to purchase the service I’d appreciate the business. </plug>
- Download the latest version 2of the VPS client. You must log into your VPS manager at https://manager.signio.com. You will need to install pfpro.exe (for NT) or pfpro (for Linux) into the same directory as the article source code.
- Copy & paste the call_pfpro.pl code below into a file named call_pfpro.pl, in the same directory that you’ve installed the articles source code. Modify line 7 by changing it to the full path name of your pfpro binary.
- Follow the instructions in the article to install & configure Perl and the application. If you don’t have a copy of the magazine, it can be found at your favorite magazine retailer. The complete text will be made available online late January, 2000. If you cannot find the magazine at your local retailer, please e-mail support@commercestore.com so that we can set you up with one.
Tags
Feedback
Something wrong with this article? Help us out by opening an issue or pull request on GitHub
Site Map
License
This work is licensed under a Creative Commons Attribution-NonCommercial 3.0 Unported License.

Legal
Perl.com and the authors make no representations with respect to the accuracy or completeness of the contents of all work on this website and specifically disclaim all warranties, including without limitation warranties of fitness for a particular purpose. The information published on this website may not be suitable for every situation. All work on this website is provided with the understanding that Perl.com and the authors are not engaged in rendering professional services. Neither Perl.com nor the authors shall be liable for damages arising herefrom.