

Data Munging with Sprog
We’ve all been there–a data translation problem rears its head and you reach for your toolkit of Perl snippets. It might involve parsing a CSV file, extracting MIME attachments, generating bulk SQL insert statements, or scraping data from a web application. You know you have code lying around that’ll take you halfway there, if only you could find it. Then there’s the problem of pulling it all together.
Wouldn’t it be great if there was a way to catalog your code snippets? How about a way to browse or search by keyword, a way to modularize your code for easy reuse, and a way to document it and easily access that documentation? Wouldn’t it be even better if you could pull the pieces together to assemble a solution without having to actually write code at all?
Now there is. Now there’s Sprog.
The Assignment
Picture yourself as a sysadmin at Example Corp. Your boss calls you in to say he’s setting up an LDAP server and he needs you to whip up an Lightweight Directory Interchange Format (LDIF) file, containing every employee’s name, phone number, and email account information. Oh, and he needs it this afternoon, so you’d better get typing.
You sit back down at your desk to contemplate your fate. Who ya gonna call? The answer hits you–the company phone list on the intranet! It has all of the information you need (Figure 1); you just need to get it out.
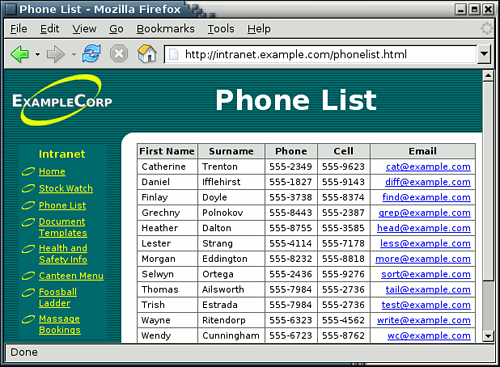 *Figure 1. The company phone list web page*
Getting Started
With a second flash of inspiration, you download the latest version of Sprog. You install the Perl Gtk bindings and a few other modest prerequisites and before you know it, you’re looking at a clean green GUI (Figure 2).
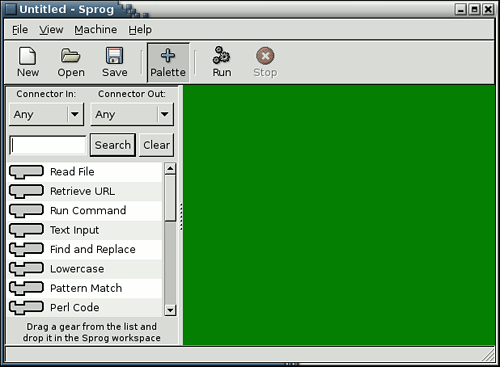 *Figure 2. The Sprog workspace*
A quick scan of the palette on the left reveals something labeled Retrieve URL, which sounds like a good start. Reading the instructions at the bottom of the window, you learn that the thing is a gear and that you can drag it across and drop it on the workspace.
Having dragged the gear onto the workspace, you right-click on it and select Properties. Up pops a properties dialog (Figure 3), with a handy box where you paste in the URL of the phone list.
 *Figure 3. A properties dialog*
Next, you drag across the Text Window gear from the palette and drop it on top of the Retrieve URL gear. It snaps reassuringly into position so that the two gears’ connectors fasten together securely (Figure 4).
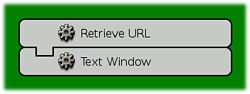 *Figure 4. Two gears connected together*
 When you click the Run button on the toolbar, the machine leaps into life. The gears turn, it retrieves data, and a text window appears to display the HTML of the phone list page. Okay, great, you haven’t written a line of code and already you’ve replicated your browser’s View Source function.
You save the machine to a file called phonelist.sprog and then look for the next clue.
Making Connections
Returning to the palette, you find a gear labelled Parse HTML Table. It looks promising, so you drag it onto the workbench. You pull apart the first two gears and attempt to add the new one in between them. Unfortunately, the new gear has a funny shaped output connector and the Text Window gear doesn’t seem to fit onto it.
You right-click on the new gear and select Help. From the help page you learn that the output connector is a list connector. The gear takes a stream of HTML text and outputs rows of data, where each row is a list of values plucked from adjacent table cells.
Once more, back at the palette, you discover a List To CSV gear, which has an input connector to match the table parser and an output connector to match the text window gear. You drag it over and snap them all together (Figure 5).
 *Figure 5. A machine to produce CSV*
Now when you run the machine again, the text window fills with lovely CSV data. It’s not that you want CSV data, of course, but at least you can see that the machine has parsed the relevant data out from the HTML page. Or has it?
On closer inspection, you realize that the machine has parsed the wrong table from the HTML. In true 1998 style, the page designer used nested tables to lay out the page. Even the list of navigation links is a table. Oh dear!
The properties dialog for the Parse HTML Table gear allows you to specify which table you want to parse. The help page explains that you can enter just a number (such as 2 for the second table) or an XPath expression. There’s even an example XPath expression which you can cut and paste to select a table based on the contents of the first cell in the first row:
//table[./tr[1]/th[1 and contains(text(), 'First Name')]]
As it happens, a bit of trial and error reveals that the phone list data is in the third table, so you set the selector to 3. Now when you run the machine, you see exactly the data you want in beautiful CSV format (not that you want CSV data, of course).
Hang on! The data still isn’t quite right. The data values don’t contain any HTML tags, but they do seem to have lots of leading and trailing white space and embedded newlines. Racing back to the palette, you grab the Strip Whitespace gear, slot it into your machine and tweak its properties to specify exactly which white space you want stripped. Now when you run the machine again, you do get truly lovely CSV data (Figure 6).
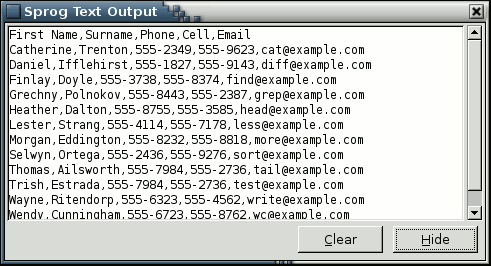 *Figure 6. CSV output*
Of course, there’s no getting away from the fact that you still don’t want CSV data.
What Were You Trying To Do, Again?
Did you know? Your email client can import LDIF files into your address book. To import an LDIF file into your Thunderbird address book:
|
Remembering your original orders, you do a bit of reading about LDIF files. Your research shows that LDIF is a fairly simple text format. You need to generate a text file with an entry for each person separated by blank lines and formatted something like:
dn: uid=cat,ou=Staff,ou=People,dc=example,dc=com
objectClass: person
objectClass: inetOrgPerson
cn: Catherine Trenton
uid: cat
sn: Trenton
givenName: Catherine
mail: cat@example.com
organizationName: Example Corp
telephoneNumber: 555-2349
mobileTelephoneNumber: 555-9623
This looks like a job for a template, and sure enough, you find a gear entitled Apply Template (TT2) in the palette. The template gear’s input connector is unlike either the pipe or the list connectors you’ve encountered so far. The help page tells you it’s a record connector that passes data using Perl hashes rather than arrays.
Back on the palette, you find a handy gear called “List to Record” that automagically converts lists to records by assuming the first row contains a column heading, which it uses for field names (hash keys). You remove the List To CSV gear and replace it with “List to Record,” followed by the Apply Template (TT2) gears. With a few clicks and drags, you reassemble your machine into its “almost final” shape (Figure 7).
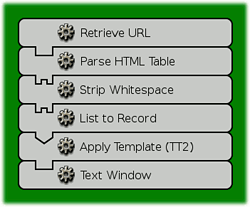 *Figure 7. Machine including template gear*
In the properties dialog for the template gear, you add a template:
dn: uid=[% email %],ou=Staff,ou=People,dc=example,dc=com
objectClass: person
objectClass: inetOrgPerson
cn: [% first_name %] [% surname %]
uid: [% email %]
sn: [% surname %]
givenName: [% first_name %]
mail: [% email %]
organizationName: Example Corp
telephoneNumber: [% phone %]
mobileTelephoneNumber: [% cell %]
The results are almost exactly what you want, except that there are a couple of places where you wanted a uid field and the closest you had available was email. You need to strip out the @example.com from the dn and uid lines. You unplug the Text Window gear and insert a “Find and Replace” gear to fix the first occurrence (Figure 8):
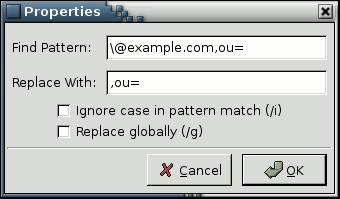 *Figure 8. Adding a "Find and Replace" gear*
and another one to fix the second (Figure 9):
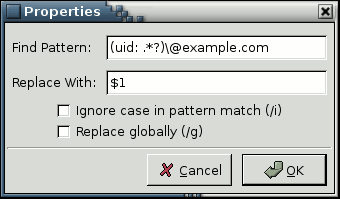 *Figure 9. Adding another "Find and Replace" gear*
and now the output is exactly like what you wanted (Figure 10).
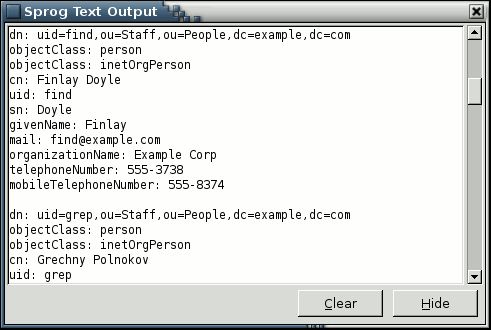 *Figure 10. Final output*
You swap out the Text Window gear for a Write File gear, select a filename, and run the machine one last time (Figure 11).
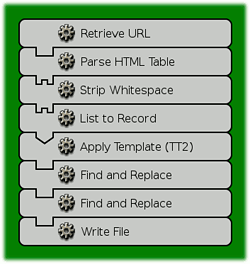 *Figure 11. The final machine*
You’ve finished the job and you never had to touch your semicolon key once.
More About Sprog
I hope this article has given you some idea of what’s possible with Sprog. It can be a useful addition to the toolbox of people who write scripts to transform data. Beyond that, though, I intend it to be a useful tool for people who don’t write scripts–scripting for the GUI guys, if you will. Anyone who’s smart enough to drive a spreadsheet is smart enough to drive Sprog. It’s just a different way of working with data. Even if the only thing those people use it for is getting data into a form their spreadsheets can handle, then that’s surely useful.
Sprog is under active development, with the framework being extended and new gears added all the time. Writing your own gears is easier than you might imagine, and there is a mailing list to ask questions and share your ideas.
Tags
Feedback
Something wrong with this article? Help us out by opening an issue or pull request on GitHub

