Catalyst
Web frameworks are an area of significant interest at the moment. Now that we’ve all learned the basics of web programming, we’re ready to get the common stuff out of the way to concentrate on the task at hand; no one wants to spend time rewriting the same bits of glue to handle parameter processing, request dispatching, and the like.
A model currently favored for web applications is MVC, or Model-View-Controller. This design pattern, originally from Smalltalk, supports the separation of the three main areas of an application–handling application flow (Controller), processing information (Model), and outputting results (View)–so that it is possible to change or replace any one without affecting the others.
Catalyst is a new MVC framework for Perl. It is currently under rapid development, but the core API is now stable, and a growing number of projects use it. Catalyst borrows from other frameworks, such as Ruby on Rails and Apache Struts, but its main goal is to be a flexible, powerful, and fast framework for developing any type of web project in Perl. This article, the first of a series of two, introduces Catalyst and shows a simple application; a later article will demonstrate how to write a more complex project.
Inspirations
Catalyst grew out of Maypole, an MVC framework developed by Simon Cozens (and discussed last year on Perl.com; see “Rapid Web Application Development with Maypole,” for example). Maypole works well for typical CRUD (Create, Retrieve, Update, Delete) databases on the Web. It includes a variety of useful methods and prewritten templates and template macros that make it very easy to set up a powerful web database. However, it focuses so strongly on CRUD that it is less flexible for other tasks. One of the goals of Catalyst is to provide a framework well suited for any web-related project.
Ruby on Rails was another inspiration; this popular system has done much to promote interest in the Ruby programming language. Features we borrowed from RoR are the use of helper scripts to generate application components and the ability to have multiple controllers in a single application. Both RoR and Struts allow the use of forwarding within applications, which also proved useful for Catalyst.
Features
Speed
We planned Catalyst as an enterprise-level framework, able to handle a significant load. It makes heavy use of caching. Catalyst applications register their actions in the dispatcher at compile time, making it possible to process runtime requests quickly, without needing elaborate checks. Regex dispatches are all precompiled. Catalyst builds only the structures it needs, so there are no delays to generate (for example) unused database relations.
Simplicity
Components
Catalyst has many prebuilt components and plugins for common modules and tasks. For example, there are View classes available for Template Toolkit, HTML::Template, Mason, Petal, and PSP. Plugins are available for dozens of applications and functions, including Data::FormValidator, authentication based on LDAP or Class::DBI, several caching modules, HTML::FillInForm, and XML-RPC.
Catalyst supports component auto-discovery; if you put a component in the correct place, Catalyst will find and load it automagically. Just place a Catalog controller in /AppName/Controller/Catalog.pm (or, in practice, in the shortened /AppName/C/Catalog.pm); there’s no need to use each item. You can also declare plugins in the application class with short names, so that:
use Catalyst qw/Email Prototype Textile/;
will load Catalyst::Plugin::Email, Catalyst::Plugin::Prototype, and Catalyst::Plugin::Textile in one shot.
Development
Catalyst comes with a built-in lightweight HTTP server for development purposes. This runs on any platform; you can quickly restart it to reload any changes. This server functions similarly to production-level servers, so you can use it throughout the testing process–or longer; it’s a great choice if you want to deliver a self-contained desktop application. Scalability is simple, though: when you want to move on, it is trivial to switch the engine to use plain CGI, mod_perl1, mod_perl2, FastCGI, or even the Zeus web server.
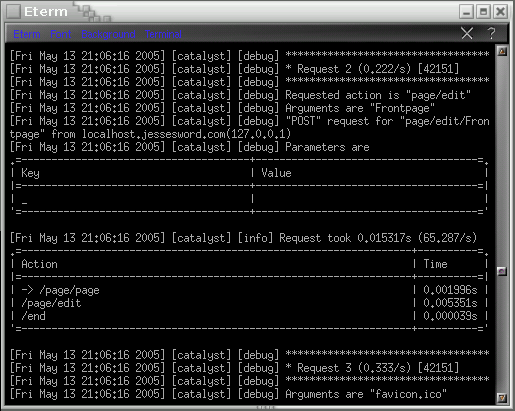
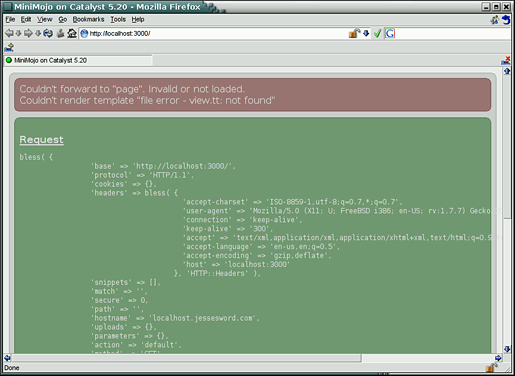
Debugging (Figure 1) and logging (Figure 2) support is also built-in. With debugging enabled, Catalyst sends very detailed reports to the error log, including summaries of the loaded components, fine-grained timing of each action and request, argument listings for requests, and more. Logging works by using the the Catalyst::Log class; you can log any action for debugging or information purposes by adding lines like:
$c->log->info("We made it past the for loop");
$c->log->debug( $sql_query );
 *Figure 1. Logging*
Crashes will display a flashy debug screen showing details of relevant data structures, software and OS versions, and the line numbers of errors.
 *Figure 2. Debugging*
Helper scripts, generated with Template Toolkit, are available for the main application and most components. These allow you to quickly generate starter code (including basic unit tests) for the application framework. With a single line, you can create a Model class based on Class::DBI that pulls in the appropriate Catalyst base model class, sets up the pattern for the CDBI configuration hash, and generates a perldoc skeleton.
Flexibility
Catalyst allows you to use multiple models, views, and controllers–not just as an option when setting up an application, but as a totally flexible part of an application’s flow. You can mix and match different elements within the same application or even within the same method. Want to use Class::DBI for your database storage and LDAP for authentication? You can have two models. Want to use Template Toolkit for web display and PDF::Template for print output? No problem. Catalyst uses a simple building-block approach to its add-ins: if you want to use a component, you say so, and if you don’t say so, Catalyst won’t use it. With so many components and plugins available, based on CPAN modules, it’s easy to use what you want, but you don’t have to use something you don’t need. Catalyst features advanced URL-to-action dispatching. There are multiple ways to map a URL to an action (that is, a Catalyst method), depending on your requirements. First, there is literal dispatching, which will match a specific path:
package MyApp::C::Quux;
# matches only http://localhost:3000/foo/bar/yada
sub baz : Path('foo/bar/yada') { }
A top-level, or global, dispatch matches the method name directly at the application base:
package MyApp::C::Foo;

# matches only http://localhost:3000/bar
sub bar : Global { }
A local, or namespace-prefixed, dispatch acts only in the namespace derived from the name of your Controller class:
package MyApp::C::Catalog::Product;

# matches http://localhost:3000/catalog/product/buy
sub buy : Local { }

package MyApp::C::Catalog::Order;

# matches http://localhost:3000/catalog/order/review
sub review : Local { }
The most flexible is a regex dispatch, which acts on a URL that matches the pattern in the key. If you use capturing parentheses, the matched values are available in the $c->request->snippets array.
package MyApp::C::Catalog;

# will match http://localhost:3000/item23/order189
sub bar : Regex('^item(\d+)/order(\d+)$') {
   my ( $self, $c ) = @_;
   my $item_number  = $c->request->snippets->[0];
   my $order_number = $c->request->snippets->[1];
   # ...
}
The regex will act globally; if you want it to act only on a namespace, use the name of the namespace in the body of the regex:
sub foo : Regex('^catalog/item(\d+)$') { # ...
Finally, you can have private methods, which are never available through URLs. You can only reach them from within the application, with a namespace-prefixed path:
package MyApp::C::Foo;
# matches nothing, and is only available via $c->forward('/foo/bar').
sub bar : Private { }
A single Context object ($context, or more usually as its alias $c) is available throughout the application, and is the primary way of interacting with other elements. Through this object, you can access the request object ($c->request->params will return or set parameters, $c->request->cookies will return or set cookies), share data among components, and control the flow of your application. A response object contains response-specific information ($c->response->status(404)) and the Catalyst::Log class is made directly available, as shown above. The stash is a universal hash for sharing data among application components:
$c->stash->{error_message} = "You must select an entry";

# then, in a TT template:
[% IF error_message %]
   <h3>[% error_message %]</h3>
[% END %]
Stash values go directly into the templates, but the entire context object is also available:
<h1>[% c.config.name %]</h1>
To show a Mason example, if you want to use Catalyst::View::Mason:
% foreach my $k (keys $c->req->params) {
  param: <% $k %>: value: <% $c->req->params->{$k} %>
% }
Sample Application: MiniMojo, an Ajax-Based Wiki in 30 Lines of Written Code
Now that you have a sense of what Catalyst is, it’s time to look at what it can do. The example application is MiniMojo, a wiki based on Ajax, which is a JavaScript framework that uses the XMLHttpRequest object to create highly dynamic web pages without needing to send full pages back and forth between the server and client.
Remember that from the Catalyst perspective, Ajax is just a case of sending more text to the browser, except that this text is in the form of client-side JavaScript that talks to the server, rather than a boilerplate copyright notice or a navigation sidebar. It makes no difference to Catalyst.
Installation
Catalyst has a relatively large number of requirements; most, however, are easy to install, along with their dependencies, from CPAN. The following list should take care of everything you need for this project:
- Catalyst
- Catalyst::Model::CDBI
- Class::DBI::SQLite
- Catalyst::View::TT
- Catalyst::Plugin::Textile
- Catalyst::Plugin::Prototype
- SQLite (the binary, not the Perl module)
Generate the Application Skeleton
Run this command:
$ catalyst.pl MiniMojo
$ cd MiniMojo
You’ve just created the skeleton for your entire application, complete with a helper script keyed to MiniMojo to generate individual classes, basic test scripts, and more.
Run the built-in server:
$ script/minimojo_server.pl
MiniMojo is already running, though it isn’t doing much just yet. (You should have received a web page consisting solely of the text “Congratulations, MiniMojo is on Catalyst!”) Press Ctrl-C to stop the server.
Add Basic Methods to Your Application Class
Add a private end action to your application class, lib/MiniMojo.pm, by editing the new file:
sub end : Private {
    my ( $self, $c ) = @_;
    $c->forward('MiniMojo::V::TT') unless $c->res->output;
}
Catalyst automatically calls the end action at the end of a request cycle. It’s one of four built-in Private actions. It’s a typical pattern in Catalyst to use end to forward the application to the View component for rendering, though if necessary you could do it yourself (for example, if you want to use different Views in the same application–perhaps one to generate web pages with Template Toolkit and another to generate PDFs with PDF::Template).
Replace the existing, helper-generated default action in the same class with:
sub default : Private {
    my ( $self, $c ) = @_;
    $c->forward('/page/show');
}
In case the client has specified no other appropriate action, this will forward on to the page controller’s show method. As Private actions, nothing can call these from outside the application. Any method from within the application can call them. The default action is another built-in Private action, along with begin, auto, and end. Again, Catalyst calls them automatically at relevant points in the request cycle.
Set Up the Model (SQLite Database) and Use the Helper to Create Model Classes
Next, create a file, minimojo.sql, that contains the SQL for setting up your page table in SQLite.
-- minimojo.sql
CREATE TABLE page (
    id INTEGER PRIMARY KEY,
    title TEXT,
    body TEXT
);
Create a database from it, using the sqlite command-line program:
$ sqlite minimojo.db < minimojo.sql
Depending on your setup, it might be necessary to call this as sqlite3.
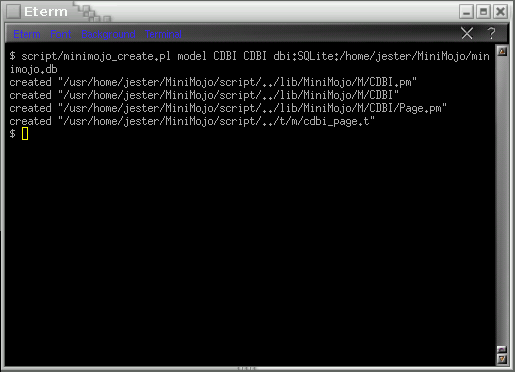
Use the helper to create model classes and basic unit tests (Figure 3 shows the results):
$ script/minimojo_create.pl model CDBI CDBI dbi:SQLite:/path/to/minimojo.db
 *Figure 3. Creating the model*
The minimojo_create.pl script is a helper that uses Template Toolkit to automate the creation of particular modules. The previous command creates a model (in contrast to a controller or a view) called CDBI.pm, using the CDBI helper, setting the connection string to dbi:SQLite:/path/to/minimojo.db, the database you just created. (Use the appropriate path for your system.) The helper will write the models into lib/MiniMojo/M/. There are various options for the helper scripts; the only requirement is the type and the name. (You can create your own modules from scratch, without using the helper.)
Set Up the View (Template::Toolkit) and Use the Helper to Create View Classes
Use the helper to create a view class:
$ script/minimojo_create.pl view TT TT
View classes go into lib/MiniMojo/V/.
Set Up a Controller Class Using the Helper
Create a controller class called Page with the helper:
$ script/minimojo_create.pl controller Page
Controller classes live in lib/MiniMojo/C/.
Add a show action to lib/MiniMojo/C/Page.pm:
sub show : Regex('^(\w+)\.html$') {
    my ( $self, $c ) = @_;
    $c->stash->{template} = 'view.tt';
    # $c->forward('page');
}
The Regex dispatch matches a page in foo.html, where foo is any sequence of word characters. This sequence is available in the $context->request->snippets array, where the page action uses it to display an existing page or to create a new one. The rest of this action sets the appropriate template and sends the application to the page action. (Leave the forward command commented out until you have written the page action.)
Restart the server with $ script/minimojo_server.pl and point a web browser to http://localhost:3000/show/ to see the debug screen (you don’t yet have the template that show is trying to send people to).
Create root/view.tt:
<html>
    <head><title>MiniMojo</title></head>
    <body>
        <h1>MiniMojo is set up!</h1>
    </body>
</html>
Test again by killing the server with Ctrl-C and restarting it, and go to http://localhost:3000/show/. You should see the page you just defined.
Add the Display and Edit Code
Modify the application class lib/MiniMojo.pm to include the Prototype and Textile plugins:
use Catalyst qw/-Debug Prototype Textile/;
Note that you can use the plugins by specifying their base names; Catalyst figures out what you mean without making you use Catalyst::Plugin::Prototype.
Modify the page controller, lib/MiniMojo/C/Page.pm, to add page-view and editing code:
sub page : Private {
    my ( $self, $c, $title ) = @_;
    $title ||= $c->req->snippets->[0] || 'Frontpage';
    my $query = { title => $title };
    $c->stash->{page} = MiniMojo::M::CDBI::Page->find_or_create($query);
}
The private page method sets a title–whether passed in to it, taken from the snippets array (that matches the regex in show), or defaulting to “Frontpage.” The $query variable holds a hashref used for Class::DBI’s find_or_create method, seeding the stash for the page variable with the result of this CDBI query. At the end of the method, control flow returns to the calling method.
Now uncomment the $c->forward('page'); line in the show action.
sub edit : Local {
    my ( $self, $c, $title ) = @_;
    $c->forward('page');
    $c->stash->{page}->body( $c->req->params->{body} )
      if $c->req->params->{body};
    my $body = $c->stash->{page}->body || 'Just type something...';
    my $html = $c->textile->process($body);

    my $base = $c->req->base;
    $html    =~ s{(?<![\?\\\/\[])(\b[A-Z][a-z]+[A-Z]\w*)}
                 {<a href="$base$1.html">$1</a>}g;

    $c->res->output($html);
}
The edit method first forwards the action off to page, so that the stash’s page object contains the result of the CDBI query. If there is a value for body, it will use this; otherwise “Just type something…” is the default. The code then processes the body with Textile, which converts plain text to HTML, and then runs the body through a regex to convert camel-case text into links, with the URL base taken from the Catalyst request object. Finally, it outputs the HTML.
Set Up the Wiki with Ajax
Modify root/view.tt to include Ajax code:
<html>
     <head><title>MiniMojo</title></head>
     [% c.prototype.define_javascript_functions %]
     [% url = base _ 'page/edit/' _ page.title %]
     <body Onload="new Ajax.Updater( 'view',  '[% url %]' )">
         <h1>[% page.title %]</h1>
         <div id="view"></div>
         <textarea id="editor" rows="24" cols="80">[% page.body %]</textarea>
         [% c.prototype.observe_field( 'editor', {
             url => url,
             with => "'body='+value",
             update => 'view' }
         ) %]
     </body>
</html>
The line:
[% c.prototype.define_javascript_functions %]
includes the whole prototype.js library in a script block. Note that the prototype plugin is available in the context object.
The section
[% url = base _ 'page/edit/' _ page.title %]
<body Onload="new Ajax.Updater( 'view',  '[% url %]' )">
<h1>[% page.title %]</h1>
<div id="view"></div>
constructs the Ajax URL and updates the view div when loading the page.
Finally:
<textarea id="editor" rows="24" cols="80">[% page.body %]</textarea>
    [% c.prototype.observe_field( 'editor', {
        url => url,
        with => "'body='+value",
        update => 'view' }
    ) %]
periodically checks the textarea for changes and makes an Ajax request on demand.
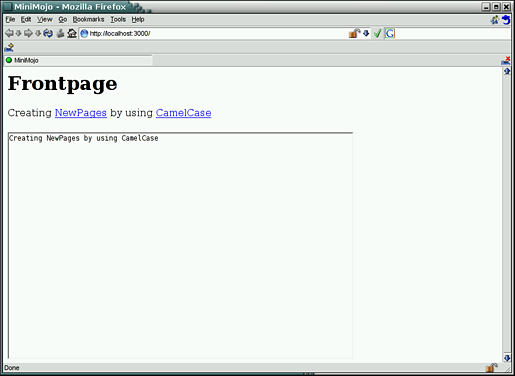
That’s it! Now you can re-run the server and your wiki is up and running (Figure 4). To use the wiki, simply start typing in the textarea. As you type, the wiki will regularly echo your entry above, passing it through the formatter. When you type something in camel case, it will automatically create a link you can click to go to the new page.
 *Figure 4. The running wiki*
Enjoy your new Catalyst-powered Ajax wiki!
Resources
For more information, see the Catalyst documentation, in particular the Catalyst::Manual::Intro module, which gives a thorough introduction to the framework. There are two Catalyst mailing lists, a general list and a developer list. The best place to discuss Catalyst, though, is the #catalyst IRC channel at irc.perl.org. The Catalyst home page is currently just a collection of a few links, but we will extend it in the near future.
Thanks to Catalyst lead developer Sebastian Riedel for help with this article and, of course, for Catalyst itself.
Tags
Feedback
Something wrong with this article? Help us out by opening an issue or pull request on GitHub


