

Accessible Software
Last year Perl.com published an article about pVoice. You learned what pVoice is, why it was built, and where it was supposed to go. Maybe you wanted to do something for disabled people yourself, by writing something like a mail client, a simple game like memory, or an instant-messaging client, but you didn’t implement it because you felt it was too much work. In that case there’s news for you.
Part of pVoice was a set of modules that was actually the engine for the user interface. A few months ago I pulled those modules from the pVoice project and made them into a CPAN distribution. This distribution is called AAC::Pvoice. And no, they have nothing to do with Apple’s digital audio format. They’re all about Augmentative and Alternative Communication. Although, I like to think that the “C” stands for “Computing,” which makes it into a better description of what those modules are for.
You can use the AAC::Pvoice modules to create GUI applications for people who have difficulty using conventional input devices like a mouse or a keyboard. Instead, those people can use your applications using only one or two keystrokes, mouse buttons, or switches on a wheelchair. You can also enhance the use of a conventional mouse or touch screen by highlighting objects on the screen as the mouse cursor hovers over them. AAC::Pvoice does not only handle the input for you, but it also provides an accessible graphical user interface.
Think of the possibilities: there are so many modules on CPAN that in conjunction with AAC::Pvoice can result in simple, accessible applications. For example, a module like Games::Battleship allows you to create a battleship game, AAC::Pvoice allows you to create the GUI and takes care of the input for you, so with very little effort you can create a game accessible for people who can’t play regular games that need full control over a mouse and/or keyboard.
This article will explain how to use the AAC::Pvoice modules step by step. It’s up to you what kind of functionality will go into the application you build.
The API of the AAC::Pvoice modules is still subject to changes, but you can trust me when I tell you that the behavior of existing methods won’t change too much, because I don’t like to go over my own code over and over again to adjust it to a new version of an API.
The Concept
The graphical user interface of AAC::Pvoice is based upon wxPerl classes, so it won’t hurt if you already know a bit about wxPerl. But since the modules handle most of the GUI for you, as you can see below, it’s much simpler to write AAC::Pvoice applications than using plain wxPerl.
Basically an AAC::Pvoice-based application consists of three entities: a Panel, a Row and a Button. A panel is a subclass of a Wx::Panel, on which one or more rows, or in fact any other Wx::Window subclass, can be placed. A row is also a subclass of a Wx::Panel, but a row can contain multiple Wx::BitmapButton objects. Those Wx::BitmapButtons however are created from a data structure you feed to the row’s constructor. These buttons don’t respond to mouse clicks on them like you’re used to, but will be invoked when the user generates a ‘Select’ event, unless of course you use a normal mouse to control the GUI. The ‘Select’ event will be discussed later.
There is a special class called AAC::Pvoice::Input. You normally won’t call any of this class’ methods directly. Instead, it’s called from the AAC::Pvoice::Panel. The Input class checks for ’normal’ mouse, mouse buttons, keyboard or parallel port input (depending on the selected device) and calls whatever the Panel defined it to do when a ‘Next’ or ‘Select’ event occurs. If only one switch is used, that switch will only generate a ‘Select’ event, and a ‘Next’ event will automatically happen every n milliseconds, depending on your settings. To understand what those events are, you need to understand how the so called ‘row/column scanning’ mechanism works. Since we’ve got multiple rows of buttons, and we have only two switches to indicate what we want to do, we can’t move the mouse cursor over the screen. Instead, we’ll use one switch to indicate ‘go to next row’ and one to indicate ‘select this row’. When we’ve selected a row, again we need the same two switches to indicate ‘go to next button in this row’ and ‘select this button’.
As you will see in the demo application below, you don’t have to worry about row/column scanning when you’re creating your application. The AAC::Pvoice::Panel takes care of that. You only have to define what your script will do when a certain button is invoked.
Creating a Demo
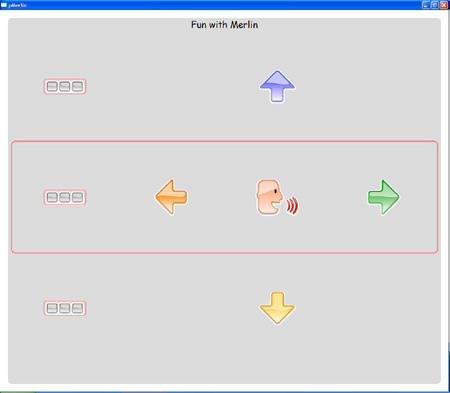
To demonstrate how you can use AAC::Pvoice to create your own pVoice-like applications, I’ll show you how to build a simple demo application. This application will use the Microsoft Agent (using the Win32::MSAgent module) to move the Merlin character over the screen and let it pronounce a phrase. It’s a very simple, silly example, but then again, it’s only to demonstrate how the AAC::Pvoice modules work. You’ll see how easy it is.
First of all, because an AAC::Pvoice based application is actually a wxPerl-based application, we have to start with a standard wxPerl framework, where we define the application and the frame, and start a main loop. This can be something like this:
use strict;
use warnings;

# Create a wxApp object and start the mainloop
my $obj = pMerlin->new();
$obj->MainLoop;

#----------------------------------------------------------------------
# the pMerlin package implements the Wx::App subclass
package pMerlin;
use Wx;
use base 'Wx::App';

sub OnInit
{
    my $self = shift;
    # Set an AppName and VendorName
    $self->SetAppName('Fun With Merlin');
    $self->SetVendorName("pVoice Applications - Jouke Visser");

    # Create a frame and show it
    my $frame = pMerlinFrame->new( undef, -1, 'pMerlin');
    $frame->Show(1);
}

#----------------------------------------------------------------------
# the pMerlinFrame package implements the Wx::Frame subclass
package pMerlinFrame;
use Wx qw(:everything);
use AAC::Pvoice;
use base 'Wx::Frame';

sub new
{
    my $class = shift;
    # Call the superclass' constructor
    my $self = $class->SUPER::new(@_);

    # Set the white background colour
    $self->SetBackgroundColour(wxWHITE);

    return $self;
}
So far, nothing special. I only used a few calls that aren’t really necessary for a default wxPerl script: I’m setting the AppName, VendorName, and I’m telling the frame to have a white background. The reason for setting the AppName and VendorName will be explained later.
Using AAC::Pvoice
Like I said, so far everything looks normal, if you’re used to wxPerl programming. But in fact this is where the actual work begins. We now need to add some code to the new() subroutine of pMerlinFrame. The first thing we need to do now is to maximize the pMerlinFrame we just defined and get the dimensions of that maximized state. We need to do this to pass the correct width and height of the frame to the AAC::Pvoice::Panel we want to create. We can define a margin around the AAC::Pvoice::Panel, which looks nicer, but it’s not necessary. In this example I’m using a margin of 50 pixels on each side of the panel.
# Get the dimensions of the maximized window
$self->Show(1);
$self->Maximize(1);
my ($width, $height) = ($self->GetClientSize->GetWidth,
                        $self->GetClientSize->GetHeight);
$self->Show(0);

# define the margin
my $margin = 50;

# define the itemspacing
my $itemspacing = 4;

# And create a pVoice panel
$self->{panel} = AAC::Pvoice::Panel->new(
                         $self,              # parent
                         -1,                 # id
                         [$margin, $margin], # position
                         [$width-2*$margin, $height-2*$margin],
                                             # size
                         wxNO_3D,            # style
                         1,                  # hide textrow
                         $itemspacing,       # spacing between items
                         3);                 # selectionborderwidth
# The grey background for the panel
my $panelbackground = Wx::Colour->new(220,220,220);
$self->{panel}->BackgroundColour($panelbackground);

# A title at the top of the panel
$self->{panel}->AddTitle("Fun with Merlin");
As you can see I’ve also defined a background colour for the panel and a title on top of it. Let’s take a closer look at the parameters of the AAC::Pvoice::Panel constructor. The first parameters look exactly like those used for Wx::Panel. The AAC::Pvoice::Panel, however, needs three new parameters. The first indicates if we should hide the (default) text row (a Wx::TextCtrl) at the bottom of the panel. For an application like pVoice, where you create phrases, this text row is of course needed. For our demo we don’t need a text row. Furthermore, we need to define the spacing between items on the panel. Effectively this is the spacing between the rows, since those will be placed directly upon this panel. Finally we need to define the width of the border around a selected row or item. It’s a good idea to make this value lower than the item spacing, otherwise the border will not be fully visible.
The next step is to create the bitmaps we want to display. For this purpose we can use AAC::Pvoice::Bitmap. This class provides an easy way to create a bitmap of a certain size, put a caption underneath it, and has some other useful features. Before we create the bitmaps, we calculate the maximum X and Y size they can use by dividing the useable X and Y size of the panel by the number of buttons per row and the number of rows respectively. I’ll also subtract twice the item spacing used in the application because otherwise the buttons will be a little bit too large.
# The maximum dimensions of a button
my $maxX = int(($self->{panel}->xsize)/4)-2*$itemspacing;
my $maxY = int(($self->{panel}->ysize)/3)-2*$itemspacing;

# Define the bitmaps.
# The parameters are the filename, maxX and maxY size and the caption
my $leftbutton     = AAC::Pvoice::Bitmap->new('img/left.png',
                                              $maxX, $maxY, 'left');
my $rightbutton    = AAC::Pvoice::Bitmap->new('img/right.png',
                                              $maxX, $maxY, 'right');
my $upbutton       = AAC::Pvoice::Bitmap->new('img/up.png',
                                              $maxX, $maxY, 'up');
my $downbutton     = AAC::Pvoice::Bitmap->new('img/down.png',
                                              $maxX, $maxY, 'down');
my $questionbutton = AAC::Pvoice::Bitmap->new('img/question.png',
                                              $maxX, $maxY, 'question');
my $rowselbutton   = AAC::Pvoice::Bitmap->new('img/rowsel.png',
                                              $maxX, $maxY, 'rowsel');
Now that we’ve got those bitmaps, we can create the AAC::Pvoice::Rows that will use those bitmaps, and know what coderefs to invoke when the user selects one of the buttons. We don’t need to create individual Wx::BitmapButtons. The AAC::Pvoice::Row takes care of that, and attaches the correct actions to the BitmapButtons in such a way that they can be invoked using any of the available input methods.
Before define the rows, we create a listref for every button, containing the button ID, the bitmap and the callback. These listrefs we put in another list of lists. That LoL defines the whole panel, and every list inside it defines the layout of each every row. Let’s see how we achieve this:
# Define the buttons on the pVoice rows
#               the id,      the bitmap,     the callback
my $left     = [Wx::NewId(), $leftbutton,    sub {$self->MoveLeft}];
my $right    = [Wx::NewId(), $rightbutton,   sub {$self->MoveRight}];
my $up       = [Wx::NewId(), $upbutton,      sub {$self->MoveUp}];
my $down     = [Wx::NewId(), $downbutton,    sub {$self->MoveDown}];
my $question = [Wx::NewId(), $questionbutton,sub {$self->Speak}];
my $rowsel   = [Wx::NewId(), $rowselbutton,
                sub {$self->{panel}->ToRowSelection}];

# The definition of the screenlayout
my $content = [ [ $rowsel,    undef,    $up,       undef  ],
                [ $rowsel,    $left,    $question, $right ],
                [ $rowsel,    undef,    $down,     undef  ] ];
You can see that the callbacks actually invoke some methods of pMerlinFrame that I haven’t discussed yet. That’s because they have nothing to do with the AAC::Pvoice modules themselves. I’m trying to keep this demo as simple as possible. At the bottom of this article you’ll find a link to a zip file that contains the complete source and images used in this demo.
The final step in creating the panel is creating the rows based upon our data structure, and then add those rows to the panel. After that there is a magic method called ‘Finalize’ we need to call on the panel, and the panel is done. First the code, then an explanation:
# Add the buttons to the rows and the rows to the panel
foreach my $row (@$content)
{
  $self->{panel}->Append(AAC::Pvoice::Row->new(
                                 $self->{panel},     # parent
                                 scalar(@$row),      # max
                                 $row,               # items
                                 wxDefaultPosition,  # pos
                                 wxDefaultSize,      # size
                                 $maxX,              # X-size
                                 $maxY,              # Y-size
                                 $itemspacing,       # spacing
                                 $panelbackground)); # background
}
# Finish the panel
$self->{panel}->Finalize();
The constructor of a row has a few unusual parameters. The first parameter is the parent, like almost every wxPerl class needs to know the parent window. The second parameter however, is the maximum number of items in a row. The row will add empty Wx::BitmapButtons to the end of a row if the third parameter (the items we want to put on the row) contains less items than the defined maximum. This ensures an even sized row. In our case we have rows with 4 items each, including some undefined items, so passing scalar($@row) is enough here.
The $row parameter contains the list of items we want to have in our row. We also have to pass the $maxX, $maxY and $itemspacing to this row, since it has to use the correct spacing between the buttons, and the empty buttons it needs to create (for the undef values in the row) need to have the correct size. The final parameter, $panelbackground, is the background color for this row, which we define to be the same as the panel background to let it look like there’s no difference between the rows and the panel.
The final thing we have to do is to define how the user can use the application. Are we going to use keystrokes, mouse buttons, the Adremo wheelchair, or normal mouse input? We can define this by setting the registry-key Device to respectively keys, icon, adremo, or mouse. This needs to be set before the AAC::Pvoice::Panel is created. I usually set this in the OnInit method of my Wx::App subclass like this:
# Set the device we use to 'icon' (left and right mouse buttons)
# other possibilities are 'keys' (keystrokes, where the space
#                           and enter key are the default keys)
#                         'adremo' (electrical wheelchair) and
#                         'mouse' (normal mouse, touch screen, etc.)
my $config = Wx::ConfigBase::Get;
my $Device = $config->Read('Device', 'icon');
$config->Write('Device',   $Device);
If we do this after we define the AppName and the VendorName, the key will appear under HKEY_CURRENT_USER\Software\<VendorName>\<AppName>\Device. There are more possible keys to define, like Buttons (either 1 or 2, defining the number of switches). You can find more information on this in the documentation of AAC::Pvoice::Input.
This is all there is to it. We now have a simple demo of an application that almost everyone is able to use. The screenshot you see on this page is the result of these simple pieces of code. As you could see, the API is extremely simple, so you can concentrate on the actual functionality you want to put in your application.
Platform Issues
The AAC::Pvoice modules can be installed on Windows as well as on Linux. However, it doesn’t look too well on Linux. If someone is interested in making the modules work correctly on Linux: patches are welcome! I would also like to see someone trying to port everything to OS X. wxPerl runs on a lot of different platforms, but in the AAC::Pvoice modules I’ve used some Win32-specific options that may have some workarounds for other platforms. I just haven’t had the opportunity to make it work on those.
Hopefully this short article inspires you to build something for people who can’t quite accomplish everything you can. After all, this is what programming should really be about – making useful applications for people who can’t build it themselves.
You can download the zipfile containing the complete script and images here.
Tags
Feedback
Something wrong with this article? Help us out by opening an issue or pull request on GitHub

