

Autopilots in Perl
X-Plane is an ultra-realistic flight simulator used by aviation pioneers like Burt Rutan, who uses it in his simulator for SpaceShipOne. The latest revision sports a flight model so accurate that the FAA has decided that your time spent in the simulator can count toward a pilot’s license.
We’ll learn how to monitor and control our virtual plane, and display our virtual aircraft’s status in real-time in a Curses window. Our display will be data-driven so that adding a single entry to a hash reference is all you need to display a new data element.
Software Requirements
Curses on OS X
Curses v1.06 seems to have some issues building on the author’s machine running OS X 10.3. Replacing Perl_sv_isa with sv_isa on line 275 of Curses.c, along with commenting out #define C_LONGNAME and #define C_TOUCHLINE in c-config.h lets Curses compile with enough functionality to run the monitor program.
Configuring the Sim
Throughout this article, we assume that you’re using X-Plane version 7.41 or higher (the demo version has all the functionality we need), and you’re flying the standard Boeing 777. This has retractable landing gears and brakes, two features we’ll eventually control from inside the monitor program, X-Plane.pl.
Once you’re settled in your airplane’s cockpit, choose the Settings menu at the top of the screen and choose Data Input & Output under that menu. A window should open to the default tab, Data Set. This is where we tell the simulator which channels of data to transmit over the network where our monitor can listen for them.
Currently, X-Plane.pl displays gear up/down status, throttle percentage, latitude and longitude, pitch and roll, and the simulation frame rate. To enable these channels for display, click the checkboxes just to the right of rows 12, 23, 18, 16, and 0 (respectively).
If you like, you can also click the checkboxes on the far right of each column to display the channel data on the plane’s windshield, as well. This is handy for debugging, especially if you’re attempting to monitor new data and don’t know what the values look like. Also, the channel numbers seem to change version to version, and if you’re using a version other than 7.41, you may need to change the code to correspond to the simulator.
Finally, the simulator has to be told where to send the monitoring packets. Choose the Inet2 tab, and click on the checkbox next to IP address of data receiver. Fill in the left-hand box with the IP address of the machine you’re running X-Plane.pl on, and fill in the right-hand box with 49999, the UDP port on which X-Plane.pl listens.
Incidentally, even though the monitor program acts as an instruction console, you don’t need to turn on the Instructor Console option listed here. It may be necessary, should you want to deal with more advanced communication such as triggering system failures, but for current purposes all we need to configure is the data receiver.
By default, X-Plane.pl listens to packets sent to 127.0.0.1 over port 49999, and sends packets to the same host on port 49000. Passing command-line parameters to X-Plane.pl can override these settings, but the documentation for the simulator seems to indicate that it’s hardcoded to listen on port 49000 for its commands, so be warned if you try to change this particular default.
Running the Monitor
Communicating at the UDP layer is a different, and much simpler, world than dealing with a full TCP/IP packet. The main differences here are that we don’t get any acknowledgement that a UDP packet is sent, and can’t even guarantee that the packet was sent at all. The practical upshot of this is that we can start and stop X-Plane.pl at any time, without the need for fancy socket tear-down protocols, and we don’t need to stop the simulator every time we change X-Plane.pl’s code.
Once we’ve started the simulator and X-Plane.pl it should start displaying the plane’s position (longitude/latitude), orientation (pitch/roll), speed, and current throttle settings. If it doesn’t, switch back to the simulator window and make sure the cockpit is being displayed. The gear display mimics an indicator lamp, with [#] representing a lit lamp, and [ ] being a dark lamp.
The simulator will only send out UDP packets when the cockpit is being displayed, and if you’re running in demo mode, it decides to interrupt your flight six minutes in with two dialog boxes that effectively stop packet transmission. If it’s still displaying the cockpit, make sure that the simulator is transmitting data to the right port on the right machine, and if all else fails, watch the network with a utility such as tcpdump to make sure UDP packets are being sent out. Press the G key to raise and lower the gear and the I and K keys to advance and retard the throttles, even on the runway. Note that the gear indicator lamp on the monitor will change before the gear handle does. Also, if running the simulator on the same machine as the monitor, you may need to bring the window with the simulator to the foreground before changes are registered.
By the way, the Boeing 777 is equipped with thrust reversers, so negative throttle settings actually make sense. Also, the flight profile dictates running the engines up to 110% of rated power on takeoff, so throttle settings beyond 100% are also legitimate.
Talking to X-Plane
Communicating with the simulator is done entirely via UDP packets. While the simulator can send and receive various types of packets, we’ll focus on one type of packet in particular, the DATA packet. The simulator communicates using packets like that described in Figure 1. The first 4 bytes of the header are the ASCII characters naming the type of packet, and the actual data is surrounded by a zero byte on both ends.
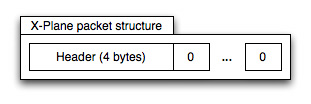
In between the zero bytes, we get one 36-byte chunk for every channel the simulator sends out. Each 36-byte chunk is broken down into two sections. The first section is a four-byte index corresponding to the channel number on the “Data Set” screen, and the rest of the chunk contains eight four-byte elements.

The actual data types of the individual elements has changed from version to version, but 7.41 seems to have settled on one layout for inbound, and a different one for outbound. When transmitting data, the simulator sends all elements as floating-point types, but receives a mixture of floating-point and long integers.
Sending Data
Handling the mixture of data types is largely the job of the core data structure in X-Plane.pl, the $DATA_packet hash reference. Starting on line 92, this data structure encapsulates everything we want to know about the simulator packet.
Given that there are currently 113 channels of data that the simulator can send out, and that the author is lazy, we’re not going to type in all 113 channels’ worth of data. Instead, we’ll store just the channels we want to display in what computer scientists call a “sparse array,” but Perl programmers call it a “hash reference.”
One useful feature the monitoring program doesn’t have is controlling the brakes. In the simulator, brakes can be applied with a variable pressure, but for our purposes they only have two settings: “Screeching halt” and “Let it roll.” The first order of business is to find out what channel brakes are displayed on.
Going back to the “Data Set” tab in the simulator, we look for “brakes” on the list. In version 7.41 they’re on channel 12, “gear/brakes.” Conveniently enough, we’re already displaying the gear setting, so it shouldn’t be much work to add brakes to the list.
Now that we know what channel brakes are on, we need to know where in the channel they’re stored. After all, we have eight elements to look through. So, click on the checkbox on the far right of row 12 to display that channel’s contents on the windshield and close the window.
At the upper right-hand corner we should see the channel contents being displayed. We’re mostly curious about the wbrak setting, which is element number 1 (counting from zero, of course.) The simulator also tells us that it’s of part type, which means that it’s a floating point value.
We’ll first need to display the brake setting. We do this at line 112, duplicating the block for the gear status and creating the following entry, which specifies that element 1 of channel 12 is a floating-point number representing brakes:
    1 => { type => 'f', label => 'Brakes',
           label_x => 0, label_y => 4,
           x => 7, y => 4 },
Restart the monitor program, and you should have a new entry for “Brakes” followed by a 0 or 1. Clicking on the “BRAKES” light in the cockpit should toggle the value. Once you’ve verified that the new brake display works, it’s time to add the code that actually sets/releases the brakes. On line 270, insert the code that transmits the new brake status to the simulator, that looks roughly like this:
  elsif($ch eq 'b') {
    transmit_DATA(
          $socket,
          12,
          -999,
          $DATA_buffer->{12}{1} ? 0 : 1,
          (-999) x 6);
  }
Since the gear and brakes are on the same channel, we have to tell the simulator to ignore the gear while letting us set the brake value, so we use the placeholder value of -999. The old brake value is saved in $DATA_buffer-{12}{1}>, so we set the opposite of whatever was there before.
Rerun the monitor program, and pressing “b” should clear and set the “brake” light on the simulator’s indicator panel. When the light is out, the aircraft should naturally start rolling, and the simulated light on the Curses window should go out.
Of course, not all types of variable are as simple to deal with as the brakes and gears. The throttle settings should give you an idea of how to work with more advanced data types, and of course you’re not restricted to a Curses display. It just happens that Curses is fairly convenient and low-bandwidth, but nothing is preventing you from transplanting the code into a GTK event loop.
While you can change values in every channel, the simulator may not react to those changes. For instance, you can’t change the latitude and longitude of the plane and expect it to teleport to the new location.
The values for latitude and longitude are actually computed from the values in channel 19, the X, Y and Z coordinates. Changing these will actually affect the plane’s position in space. However, there doesn’t appear to be a simple reference that will describe what values are considered read-only.
The official UDP documentation doesn’t contain this, and the only UDP FAQ on the ’net for X-Plane appears not to have been updated since version 6. Of course, some of the channels make no sense on certain aircraft. For instance, the Cessna 172 (which the author has several hours’ experience in) doesn’t have retractable gear.
Receiving Data
Receiving data is also done through the $DATA_packet sparse array. In this case, the element type is just used for display purposes, as the channel is transmitted in floating point, and not the mixed format. The entry for “True Speed”, which is displayed in miles per hour, looks like this:
 104 2 => {
 105   0 => { type => 'mph', label => 'True Speed',
 106          label_x => 0, label_y => 1,
 107          x => 12, y => 1 },
 108 },
When time comes to walk the DATA packet, this entry tells us to see if we’ve received data channel 2 (line 104). If we have, look at element 0, and display the element at (12,1) in the window (line 107.) Since the type is “mph” (line 105), we know that we have to format that specially.
Special types like “mph” and “deg” are stored in another hash reference, back on lines 81-85. When the time comes to display the actual data, we look into this hash reference to pull out the format string to use when sprintf()‘ing the data. The len hash key gets used as well at this time, to create a mask of space characters that we use to erase the old value completely before displaying the new value.
  81 my $typedef = {
  82   deg => { format => "%+03.3f", len => 8 },
  83   mph => { format => "%03.3f", len => 7 },
  84   pct => { format => "%+01.3f", len => 6 },
  85 };
A special type bool is used for indicator lamps (since indicator lamps are either on or off), but is handled specially. The pseudo-types l and f aren’t represented here, but are used when we need to return data to the simulator. While the simulator sends out only floating-point numbers, it receives a mixture of floating-point and integer values, and the mixture changes on a per-channel basis.
Instead of making the programmer create the format strings that we’ll use later on to pack() and unpack() packets, we pre-compute them in the function create_pack_strings(). Since the individual elements may occur anywhere in the eight-element array, we may need to skip over elements, and that’s done with liberal use of x4 in the format, which tells pack() and unpack() to ignore 4 bytes’ worth of data.
 164 sub create_pack_strings {
 165   for my $row (values %$DATA_packet) {
 166     $row->{unpack} = 'x4';
 167     $row->{pack} = 'l';
 168     for my $j (0..DATA_max_element) {
 169       if(exists $row->{$j}) {
 170         my $col = $row->{$j};
 171         $row->{pack} .=
 172           (grep { $col->{type} eq $_ } @float_formats) ? 'f' : 'l';
 173         $row->{unpack} .= 'f';
 174       }
 175       else {
 176         $row->{pack} .= 'f';
 177         $row->{unpack} .= 'x4';
 ...
Starting at line 164, create_pack_strings() handles this tedious job for us, by walking the two-dimensional hash reference $DATA_packet. Line 166 starts the unpack() string with x4, which tells the unpack() function to skip over the index long in the packet. We have to unpack the index beforehand in order to know how to deal with the data, so we just ignore that.
Line 167 starts the pack() string with a long, l for the inbound index. Lines 168 onward create the individual elements. The unpack() strings are f if the element is in use, x4 if it’s not. This means that the format strings only extract the data we need, which makes it easier later on when time comes to actually call unpack() on the actual data.
Lines 171-2 and 176 create the pack() format string, using f for floating-point formats and l for integer types. Since there’s no special way to tell the simulator what elements we’re updating, we have to send back every element. Unused elements are filled with a sentinel value of -999 to say “Do not update this value.”
In the end, we’ve added pack and unpack hash keys to every channel in our $DATA_packet structure. Unpacking a channel structure with this format returns to us only the data we’re interested in, and skips over unused elements so we don’t have to account for empty elements in the array that pack() returns to us.
Likewise, the pack hash key gives us a string to create an entire channel’s worth of data, with the proper data types. This is important, even in what should be a simple channel like the gear and brake display. While gears get set to an integer 1 or 0, brakes have to be set to a float from 0 through 1, to account for variable pressure.
Pulling Apart the Packet
All of the heavy lifting gets done in the receive_DATA() function, from lines 193-234. This function accepts the message sent over the UDP port and breaks it into individual channel-sized packets. The adventure starts on line 196, after clearing a small internal buffer we use to record the last packet received.
  196   for (my $i = 0;
  197        $i < (length($message)-&DATA_header_size-1) / DATA_element_size;
  198        $i++) {
  199    my $channel = substr($message,
  200                         $i * DATA_element_size + DATA_header_size,
  201                         DATA_element_size);
Line 197 computes the number of channels this particular message contains (we’re doing this on-the-fly in case you want to change the channel selection while the simulator is running.) The substr() call breaks the message into chunks of DATA_element_size bytes, and gives us back a channel’s worth of data.
  203    my $index = unpack "l", $channel;
  204    next unless exists $DATA_packet->{$index};
Next, we extract the index (the first byte) of the channel so that we can unpack the data appropriately. If we don’t know anything about this channel (i.e., if it isn’t present in the $DATA_packet hashref), we reject it and move on. This makes us somewhat immune to changes in format.
  206    my $row = $DATA_packet->{$index};
  207    my @element = unpack $row->{unpack}, $channel;
Next, we get back the elements we’re interested in here by unpacking with the format string that got calculated in create_pack_strings(). The format string skips the index and unpacks just the elements we wanted. So, now we walk our proffered hash and extract the individual elements:
  208     my $ctr = 0;
  209     for my $j (0..DATA_max_element) {
  210       next unless exists $row->{$j};
  211       my $col = $row->{$j};
  212       $DATA_buffer->{$index}{$j} = $element[$ctr];
Line 208 initializes a counter so that we can keep track of which element we’ve extracted. Line 209 loops through each possible element in order, so we take into account the possibility that we haven’t used a data element.
Lines 210-212 skip unused elements in the sparse array, and saves the content in $DATA_buffer, so we can have keys like g toggle the gear setting, rather than having one key to raise the gear and one key to lower them.
Finally, we display each element based on its type. Boolean types are displayed as either [#] or [ ] depending upon whether the element is a floating one or zero. They’re still written out as an integer, but displayed as floating.
Types such as deg and mph with a registered format are handled specially. We first wipe out the old data completely by overwriting with spaces. This prevents a potential issue with the old value being “3.14159”, and the new value being “2.7”. If we didn’t overwrite the old value, it would be displayed as “2.74159”, with the extra digits remaining from the old display.
If we’ve not been told what to do with this (which is the case with Frame Rate), simply print the value and go onward.
Data-Driven Design
In the current monitor program, each channel in a DATA packet corresponds to a set of fields onscreen. Instead of creating a function to display the onscreen labels and another one to extract the information from the packets, we’ve elected to combine the label information with the channel and field, in one easy-to-use format.
Since the number of channels and their layout varies between versions of the simulator, we’ve chosen to represent the channels in a two-tiered hash reference. The outer tier represents a channel, and the inner tier represents the fields inside that channel.
This means that if a channel changes index number (as the pitch and roll channel did from version 7.1 to 7.4), we simply update the channel number in the hashref rather than cutting out a block of code and repositioning it in an array, making maintenance easier.
Since this data likely won’t change over the lifetime of the program, we’ll store it in a global hash reference, $DATA_packet starting at line 92. We can reference a given element in an arbitrary channel with the code fragment $DATA_packet-{$channel}{$element}>, but the code usually ends up iterating by channel and by element.
The sample for the gear display starts at line 109, and the entire channel/element reference looks like:
  109  12 => {
  110    0 => { type => 'bool', label => 'Gear',
  111           label_x => 0, label_y => 3,
  112           x => 6, y => 3 },
  113  },
This is the only element in channel 12, and sits at element 0. Boolean types are displayed with [#] and [ ] representing indicator lamps, and it specifies the screen coordinates of the label (label_x and label_y) and where the actual indicator goes (x and y).
After Curses initializes, the setup_display() function iterates over this two-tiered hash and draws the label strings that won’t change. Lines 148-156 take care of this, and show how to iterate over the data structure:
  148 sub setup_display {
  149   for my $channel (values %$DATA_packet) {
  150     for my $element (values %$channel) {
  151       $win->addstr($element->{label_y},
  152                    $element->{label_x},
  153                    $element->{label}) if $element->{label};
  ...
Note that $win-addstr()> takes the Y coordinate followed by the X coordinate, in accordance with long-standing tradition. Later on, we’ll use the type hash key to tell us how to display this data, but that’s handled when we receive a message.
Initialization and Shutdown
We start by handling the usual command-line options on lines 24-32, including a -h option to display usage. -x sets the X-Plane IP address to something other than the default of “127.0.0.1,” -r changes the port the monitor listens on from 49999 to something else.
Incidentally, the listening port cannot be 49000, as that’s where the simulator listens for its commands. -t tells the monitor to transmit on a different port than 49000, although the simulator is documented to listen to only port 49000. -d is there in case this gets run with earlier versions than 7.4, where the packet format varied depending upon the operating system the simulator was running on.
After command-line configuration is processed and defaults overridden, we create the UDP sockets, on lines 48-65. Instead of the usual TCP protocol, we open UDP ports as that’s what the simulator communicates with. If we did this after initializing Curses, our error text would be eaten by the terminal, so we place this first.
Startup and Shutdown of Curses
The Curses startup proceeds fairly normally starting on line 314, with the call to noecho() and cbreak() stopping the terminal from echoing key presses and suppressing carriage returns. $win->timeout(1); lets us read key presses without blocking, so we can display packets as they come in real-time without having to wait for key presses.
Displaying Text
Since Curses implementations vary widely in functionality, we limit ourselves to making addstr() and getch() calls to ensure maximum compatibility across platforms. Inside setup_display() we draw the static labels such as “Gear” and “Pitch,” and do the job of displaying the actual values inside receive_DATA().
The Main Loop
This makes the main loop on lines 301-311 pretty straightforward. We poll the keyboard, and display the latest data packet if there isn’t one. Otherwise, check to see if the user pressed “q”, in which case we quit. UDP sockets don’t require any special tear down, so all that’s left is to call endwin();. If the user pressed a command key, create an appropriate packet and send that out.
With just the DATA packet, you can create your own customized cockpit display, even take this sample source and turn it into a Gtk application that lets you monitor your plane graphically. The VEHA packet type adds even more possibilities. You could read a friend’s virtual location and add his plane as traffic in your virtual world.
Even better, scrape HTML from a flight-tracker service and add real traffic to your virtual world! The FAIL and RECO packet types can cause simulated system failures, so you can create your own in-flight emergencies in Perl! You can even go all the way, and use the SNAP packet type to completely override X-Plane’s flight model, telling X-Plane how you think the aircraft should fly.
Hopefully now that I’ve demystified some of X-Plane’s internal workings you’ll be inspired to create your own tools, maybe even design and build your own fly-by-wire plane, all in Perl.
Tags
Feedback
Something wrong with this article? Help us out by opening an issue or pull request on GitHub

