

Introducing AxKit
Series Introduction
This article is the first in a series of articles introducing the AxKit web application platform. Starting from the basics, this series explains how to install a basic AxKit server and then explores AxKit’s more powerful capabilities. Basic familiarity with (or ability to google for) XML, Apache, and mod_perl is assumed but expertise is not required. Some References and Helpful Resources are provided at the end of this article to help get you started as well.
AxKit: What is it?
If you already know about AxKit and the wonders of server side XML processing, you may wish to skip to the Basic Installation section.
AxKit is an application and document server that uses XML processing pipelines to generate and process content and deliver it to clients in a wide variety of formats. It’s important to note that AxKit is not limited to XML source documents; non-XML documents and data sources can be converted to XML as needed. A basic AxKit pipeline looks like:
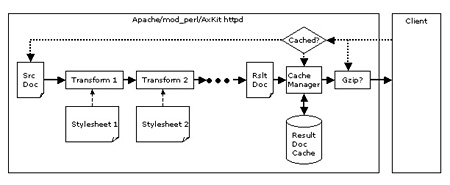
The source document may be an article, a data set, data returned by a database query, the output from a Perl routine, mod_perl handler, CGI script, etc., etc. This document is fed in to the first processor (“Transform 1”) which alters it according to a “stylesheet”, which specifies a set of transforms to apply to the document. The output from the first processor is fed to the second, the second to the third, and so on until the final document is passed to the browser.
Processing techniques available conventional XML processing like XSLT, advanced processing more suited to dynamic content (such as Perl versions of XSP and tag libraries), and low-level processing in Perl for those occasions where high level abstractions merely get in the way.
AxKit provides seamless caching (of both code for generating dynamic content and for transformed documents), compression, and character set conversion. AxKit also allows other technologies (CGI scripts, session management tools, data converters, Perl modules, Inline::C, etc) to be used to extend its capabilities.
The current version (v1.5) is tightly coupled with Apache/mod_perl and leverages the exceptional configurability and performance of that platform; work is underway to enable use in other environments like offline processing, cgi-bin, and standalone servers.
Why AxKit?
All the hype surrounding in-browser XML processing makes it seem like there should be little or no need for server-side XML processing. However, for a variety of reasons, XML in the browser is just not available everywhere and, when available, has limitations that server side processing addresses.
Server-side XML processing allows content to be queried, reorganized, translated, styled, and so on, before sending the “final” HTML, XML, text, SVG, or other output to the browser. The server can implement heavy duty data processing using the most effective and appropriate tools (as opposed to the rather more limited tools available client-side, even when you can control the client configuration). The server can then decide to deliver a formatted document ready for presentation and display or to delegate presentation formatting (and its attendant processing overhead) to the client. In some sense, that’s an ideal approach: use the server to apply heavyweight or unusual transforms and offload the presentation formatting to the browser.
Some of the advantages of using XML on the server are:
- XML can be transformed on the server in to a wide variety of content delivery languages: XML, WML, XHTML, HTML, RTF, PDF, graphics formats, plain text, etc.
- Presentation can be separated from content and logic so that transforming the presentation does not mean altering the XML documents or settings on the authoring tools. This article demonstrates separating logic, content and presentation.
- Even using the same delivery language (HTML, say), documents can be formatted in different ways for differing display media, screen vs. printer, for instance.
- XML offers support for specifying the character encodings. Source documents can be transcoded into different character sets depending on the browser.
- XML documents can be expressed in a natural order for their “primary” display mode and reordered differently to provide different views of the data. Terms in a document’s glossary or index are not in document order, for instance.
- As the content and capabilities of a web site evolves, new XML tags can be introduced in new content without having to “upgrade” older articles. We’ll touch on tag libraries (taglibs) in this article and examine them in more depth in later articles.
- XML related technologies are becoming well known; hiring XML literate personnel is becomming easier. With in-house proprietary formats, you always have to train them yourself. With third party proprietary formats, you hope you can get good enough training to do what you need.
- XML processing tools (XSLT, editors, etc) are becoming commonly available, so adopting XML outside of the IT department is feasible. There’s still a gap in support for WYSIWYG authoring tools, though some are now commercially available.
- XML can optionally be transformed on the client for browsers that offer sufficient features, thus reducing server workload. Be prepared for slow client-side transforms on larger pages, and you will probably want to do reordering and subsetting operations on the server.
- XML can provide descriptions of the structure of your web site and its content in multiple formats. The “Semantic Web” is coming to a browser near you (real soon now ;-). One of the biggest academic concerns about the web is the lack of semantic content. When looking at a page from a book in HTML format, who’s to say whether a heading enclosed by <H1> is a book’s author, title, publisher, or even a chapter or section heading? XML can be used to clarify such issues, and standards like the Resource Description Framework (RDF, of course) are gaining ground here.
- XML-based technologies like the RDF Site Summary (RSS) and the more general Resource Description Framework can be leveraged to allow automated navigation, syndication, and summarization of a web site by other web sites. This is especially applicable to portions of a web site containing current news and press releases; these are often reproduced on other sites’ news summaries and “headlines” pages.
AxKit enables all of this and far more. Unlike some more insular environments, AxKit happily bolts up to almost any other technology that you can load in to an Apache web server or reach using external requests.
Basic Installation
This section will walk you through a manual installation, but there’s an easier way if you just want to play with AxKit: grab the AxKit demo tarball for this article, untar it and run the install script therein. The tarball includes the prerequisites necessary for most modern Unix-like systems and will be updated new versions and example code with each article. If this works for you (it’s been tested on both Linux and FreeBSD), you can skip all of the manual install instructions and jump to Testing AxKit.
AxKit ties together a lot of different technologies and uses a lot of CPAN modules. Doing a basic manual install is not difficult if CPAN.pm (or equivalent; a CPANPLUS is in the works as of this writing) is working on your system.
The first step in installing AxKit is big, but not usually difficult: installing Apache and mod_perl 1.x versions (2.x versions are in development but are not released at the time of this writing). The mod_perl Developer’s Guide covers this process in detail. Here’s a quick recipe for a Unix system “private” (ie non-root) install in /home/me/axkit_articles-1.0 (vary the version numbers to suit):
$ mkdir axkit_articles-1.0
$ cd axkit_articles-1.0
$ lynx http://httpd.apache.org/dist/httpd/  # Get the latest 1.x version of apache
$ lynx https://www.apache.org/dyn/closer.cgi/perl/mod_perl-1.31.tar.gz  # Get the latest 1.x version of mod_perl.
$ gunzip apache_1.3.23.tar.gz
$ tar xf apache_1.3.23.tar
$ gunzip mod_perl-1.26.tar.gz
$ tar xf mod_perl-1.26.tar
$ cd mod_perl-1.26
$ perl Makefile.PL \
>   APACHE_SRC=../apache_1.3.23/src/ \
>   DO_HTTPD=1 \
>   USE_APACI=1 \
>   APACHE_PREFIX=/home/me/axkit_articles-1.0/www \
>   PREFIX=/home/me/axkit_articles-1.0/www \
>   EVERYTHING=1
$ make
$ make test
$ make install
It is usually wise to write your AxKit/mod_perl/Apache build process in to a script so that you can debug it, repeat it, and alter it as needed. Servers like these are immensely powerful and configurable; it’s pretty likely that you’ll want a reproducable, tweakable build environment for them.
On Windows, look for the most recent Apache Win32 binary in http://httpd.apache.org/dist/binaries/win32/ and then use PPM to install a mod_perl binary. NOTE: it is not recommended to use Windows for production Apache/mod_perl servers; Apache/mod_perl 1.x is not able to scale well on this platform; Apache/mod_perl 2.x is addressing the fundamental architectural disagreements that cause this.
If all went well, running
$ www/bin/apachectl start
should fire up a (non-AxKit) httpd on port 8080. In case of trouble (both packages are mature, so trouble is not frequent), see the References and Helpful Resources section at the end of the article for some places to seek help.
The next part is to install some AxKit prerequisites: the GNOME project’s libxml2 and libxslt will be used by the examples in this series of articles, though they project’s libxml2. To see if they are already installed, try:
$ xml2-config --version
2.4.13                         # Need >= 2.4.13
$ xslt-config --version
1.0.10                         # Need >= 1.0.10
If not, grab them from the source tarball for the article or a random GNOME mirror and install them using ./configure && make && make install. The tarball above installs all of the prerequisites in the “private” install tree; here we’re installing them in the system’s shared locations to keep the manual install easy. See the commands generated by the install script if you want private copies.
Please note: libxslt 1.0.10 has a known (very minor) failure in its test suite which causes
maketo fail on some systems when testingtests/exslt/sets/has-same-node.1.xsl. Theinstallscript provided with this article’s source tarball removes the offending test before runningmake.
Now that all of the major prerequisites are installed, let’s let CPAN.pm install the final pieces:
$ su
Password:
# perl -MCPAN -e shell
...
cpan> install XML::LibXSLT
...
cpan> install AxKit::XSP::Util
...
cpan> quit
# exit
The AxKit::XSP::Util installation should install AxKit and a number of other prerequisites. If CPAN.pm does not work for you, you might just want to grab the axkit-demo tarball mentioned above and install the packages you find there by hand. There are a lot of them, though, so getting CPAN working is propably the easiest way to do a manual install.
Testing AxKit
All of the relative directories mentioned from now on assume that you are in the
axkit_articles-x.ydirectory unless otherwise indicated.
Once all of the required modules are installed, tweak the www/conf/httpd.conf file to load AxKit by adding:
##
## AxKit Configuration
##

PerlModule AxKit

<Directory "/home/me/axkit_articles-1.0/www/htdocs">
    Options -All +Indexes +FollowSymLinks

    # Tell mod_dir to translate / to /index.xml or /index.xsp
    DirectoryIndex index.xsp
    AddHandler axkit .xml .xsp

    AxDebugLevel 10

    AxGzipOutput On

    AxAddXSPTaglib AxKit::XSP::Util

    AxAddStyleMap application/x-xsp \
                  Apache::AxKit::Language::XSP
</Directory>
We’ll walk through the configuration in a bit, but first let’s add a www/htdocs/index.xsp test page that looks like:
<?xml-stylesheet href="NULL" type="application/x-xsp"?>
<xsp:page
    xmlns:xsp="http://www.apache.org/1999/XSP/Core"
    xmlns:util="http://apache.org/xsp/util/v1"
>
  <html>
    <body>
      <p>Hi! It's <util:time format="%H:%M:%S"/>.</p>
    </body>
  </html>
</xsp:page>
Now you should be able to restart the server and request the test page like so (whitespace added for readability and so it can be compared to index.xsp easily):
$ www/bin/apachectl restart
$ lynx -source http://127.0.0.1:8080/
<?xml version="1.0" encoding="UTF-8"?>
<html>
  <body>
    <p>Hi! It's Tue Feb  5 16:26:31 2002.</p>
  </body>
<html>
Each request should generate a new page with a different time stamp. You may need to tweak the Port directive in www/conf/httpd.conf if something’s already running on port 8080.
How the example works
Later articles in this series will examine various features of AxKit in more depth, for now let’s take a look at how the example from the installation section works.
In fact, hopefully by the next article, a new release of AxKit should have a simple demo facility for each of it’s major XML processing alternatives available. If so, the tarball accompanying the next article will contain the new release.
The Configuration
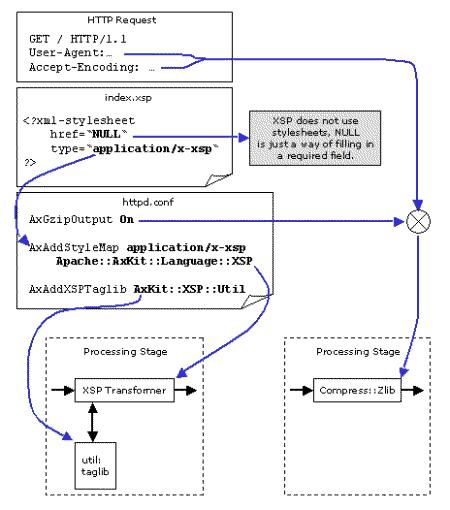
AxKit integrates quite tightly with the Apache configuration engine. The Apache configuration engine is far more than a text file parser: it forms the core of Apache’s request handling capabilities and is the key to Apache’s flexibility and extensibility. The directives added to the server’s configuration above are a mix of native Apache directives and AxKit directives. Let’s walk through the first part of the request cycle and see how the Apache configuration directives affect the request.
The Apache httpd is primarily a configuration engine and a collection of special-purpose modules. This discussion glosses over the fact that several modules other than mod_perl and AxKit are used to process this request and refers to them all as “Apache”.
When the HTTP request arrives, Apache parses it and maps the path portion of the URL ("/") to a location on the harddrive (/home/me/axkit_articles-1.0/www/htdocs). The URI maps to a directory and the Apache directives “DocumentRoot” (not shown, it’s part of the default install), “<Directory>”, “Options +Indexes” and “DirectoryIndex” cause Apache to map this URI to the file index.xsp.
Now that the underlying resource has been identified, Apache uses the .xsp extension to figure out what module should deliver the resource to the browser. The AddHandler AxKit .xsp directive tells Apache to delegate the response handling to AxKit. This is very similar to establishing a mod_perl handler for a URI except that it is implemented in C and is a bit faster than a standard mod_perl response handler.
The Processing Chain
The test document, index.xsp is an example of XSP, eXtensible Server Pages, one of the several languages that AxKit supports. We’ll get to how the XSP is processed in a moment.
When AxKit begins the task of handling the response it has already, through cooperation with Apache’s configuration engine processed it’s configuration directives. These have the following effects:
AxDebugLevel 10
Causes quite a lot of output in the www/logs/error_log,
AxGzipOutput On
Enables automatic gzip compression (via Compress::Zlib). This is only used if the client can accept compressed documents. AxKit even goes the extra mile and compresses output for a few clients that can handle it but don’t set the HTTP Accept-Encoding: header properly.
AxAddStyleMap application/x-xsp Apache::AxKit::Language::XSP
Establishes a mapping between the MIME type “application/x-xsp” and the Apache::AxKit::Language::XSP module. We’ll see shortly how this mapping tells AxKit what module to use when applying a type of transform.
AxAddXSPTaglib
Notes that the XSP engine needs to load the AxKit::XSP::Util (this supplies some of the Perl code called by index.xsp),
The first thing AxKit needs to do when handling a response is to configure the processing pipeline. The first place AxKit looks for directions is in the source document; it scans the source document for <?xml-stylesheet...?> processing instructions like:
<?xml-stylesheet href="NULL" type="application/x-xsp"?>
AxKit has two alternative mechanisms that provide far more power and flexibility; we’ll look at these as we walk through more advanced configurations in later articles.
The xml-stylesheet PIs specify a list of transforms to apply to the source document; these are applied in the order that they occur in the document. Each processing instruction specifies a stylesheet (“NULL” in this case: XSP doesn’t use them, we’ll cover that in a moment), and a processor type (“application/x-xsp”). The AxAddStyleMap directives specify which Perl modules handle with processor types, and the one in our example maps application/x-xsp to Apache::AxKit::Language::XSP.
That’s all quite complex; here’s a diagram that shows how the most important bits of this example affect the processing pipeline:
and the resulting pipeline looks like:
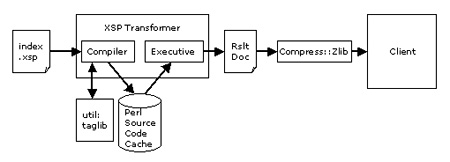
As the diagram shows, the source .xsp page is read from disk, then compiled in to Perl source code (using the util: taglib as necessary) and cached on disk. The resulting source code is then run to generate the result document for this request, which is compressed (if the client supports compression), and sent to the client.
You can see the source code in
www/logs/error_logwhen theAxDebugLevelis set to at least 10.
Note that AxKit is smart enough to not cache the output document (there’s no cache between the XSP processor and the output); XSP is intended for dynamic pages and its output documents should not be cached.
When index.xsp is compiled, the resulting code builds the output document node by node. The <util:time .../> tag is converted in to a subroutine call that calls perl’s localtime function. See the error_log to see the generated Perl (our AxDebugLevel is set to 10, so XSP.pm emits this to the error log), and see the function get_date() in AxKit::XSP::Util for the localtime() call.
XSP and Taglibs
XSP is unlike most XML processing “languages” in that it does not actually use stylesheets; instead, XSP pages contain special tags that are executed each time the page is requested. In index.xsp, for instance, the <util:time format="%H:%M:%S"/> tag is converted in to Perl code which calls localtime.
Most XML filters apply a transform to the source XML to generate the result XML. These transforms are called “stylesheets”. As mentioned, XSP does not use stylesheets. We will cover stylesheet based transforms in future articles.
The util: portion of the tag is a prefix indicating that the util taglib will handle that tag. The util: prefix is an XML namespace prefix and is not hard-coded; the xmlns:util attribute in the root element of index.xsp:
<xsp:page
    xmlns:xsp="http://www.apache.org/1999/XSP/Core"
    xmlns:util="http://apache.org/xsp/util/v1"
>
binds the util: prefix to the taglib. The module that provides the code behind the util: taglib, AxKit::XSP::Util, has the same URI ("http://apache.org/xsp/util/v1") hardcoded in it. When the AxAddXSPTaglib directive is seen in the httpd.conf file, AxKit::XSP::Util registers with the XSP module to handle all tags in that namespace.
An XSP page may include as many taglib namespaces and tags as it needs. CPAN contains a large and growing collection of taglibs for use with AxKit’s XSP implementation, and we’ll look at two ways of writing taglibs for Apache in the next two articles.
The taglibs approach is superficially similar to many of the templating engines on CPAN; indeed, some of the the templating systems have been extended recently to includ taglibs. There are several important differences between these and XSP, however.
- XSP input files must be well formed XML, this makes it impossible to generate malformed XML. With templating systems, typos in the content markup can easily reach the browser with no warnings.
- The source document may be transformed before it is handed to the XSP processor. This allows you to build simple taglibs as XSLT transforms deployed upstream of the XSP processor. Because AxKit’s XSP translates XSP pages in to code and caches the code, these transforms will not be run each request; they are captured in the cached code. This can also be used to “capture” static transforms.
- XSP encourages content, logic, and presentation to be separated; XSP pages add logic to content and generate well formed XML that can be (and usually is) massaged by “real” stylesheets to effect different presentations.
- as with some of the more sophisticated templating systems, XSP is designed to be extensible; adding a taglib is as simple as configuring adding an
AxAddXSPTaglibstatement to thehttpd.conffile and then referring to it in the source document. In the test code, the<util:time>tag is provided by theApache::XSP::Utilmodule, and you may load as many taglibs as necessary in to the server.
Milepost 1 and the Road Ahead
This is the first article in this series, presenting AxKit’s installation and introducing one of AxKit’s processing technologies: XSP. In the next article we’ll see how to chain together filters to apply stylesheets to both static documents and XSP-generated documents to allow the same documents to be delivered in different forms. Following that we’ll examine how to write taglibs in Perl (the recommended approach) using some helper modules, and XSLT.
References and Helpful Resources
There are several very helpful places to research problems, ask questions, and learn more. Try to find others who have had similar problems before posting a question, of course, but the user groups listed here are the place to ask:
the AxKit web site (which may have moved to an xml.apache.org site by the time you read this) The “official” AxKit web site.
The AxKit Guide An in-depth introduction to AxKit.
The axkit-users@axkit.org mailing list. Browse the archives or subscribe. This is the place to discuss AxKit-specific problems and offer solutions, patches and success stories. The mod_perl resources listed here are perfect for general mod_perl build and support issues as well.
mod_perl Developer’s Guide The first place to check for Apache+mod_perl build advice and debugging tips.
modperl@perl.apache.org email archives Look here to see if anyone else has had your problems and (usually) found a solution. This list is about to move to an @perl.org address at the time of this writing so I won’t point you to a soon-to-be-stale subscription form.
perl-xml@listserv1.ActiveState.com A mailing list for general perl and XML questions, including axkit support. (subscribe at http://listserv.activestate.com/mailman/listinfo/perl-xml).
The #axkit IRC channel at irc.rhizomatic.net
A friendly place where you can often get quick advice right from experienced AxKit users and contributors.
As with all online Open Source communities, please do try to pay forward any help you receive.
Thanks to Martin Oldfield, Kip Hampton and Robin Berjon for their thorough technical reviews, though I’m sure I managed to sneak some bugs by them. AxKit and many of the Perl modules it uses are primarily written by Matt Sergeant with extensive contributions from these good folks and others, so many thanks to all contributors as well.
Copyright 2002, Robert Barrie Slaymaker, Jr. All Rights Reserved.
Tags
Feedback
Something wrong with this article? Help us out by opening an issue or pull request on GitHub

