

Building Telephony Applications with Perl and TwiML
Perl makes writing Twilio telephony applications simple and enjoyable. My previous article, Automating Telephony with Perl and Twilio showed how to use WWW::Twilio::API to make a phone survey using Twilio’s text-to-speech synthesizer as well as send an SMS message to a phone number of your choice.
This article builds an easy phone menu application using Twilio’s TwiML application language, WWW::Twilio::TwiML, and Mojolicious.
Installation and Twilio account creation
To begin, install WWW::Twilio::TwiML and Mojolicious using your favorite method (see the previous article for more ideas). You’ll need a Twilio account (it’s free to create an account, plus Twilio gives new users US $30 for calls–plenty for several weeks of testing). The previous article covers installation and getting setup with a Twilio account in more detail. With WWW::Twilio::TwiML and Mojolicious installed and a Twilio account active, it’s a great time to get a little more familiar with Twilio’s Dashboard.
Twilio Dashboard
The Twilio Dashboard is where to find your Twilio sandbox information. The sandbox section of the dashboard is located below the fold of the dashboard page:
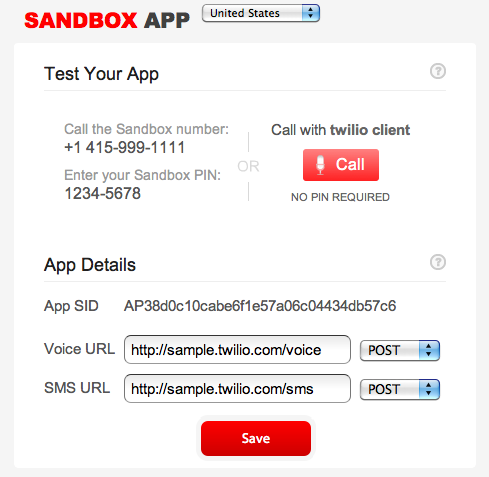
You should see the sandbox number and pin. You can set our inbound voice and inbound SMS handler URLs there (I’ll explain those soon.) First, a primer on how Twilio works.
TwiML in the Twilio flow
Twilio’s basic flow goes something like:
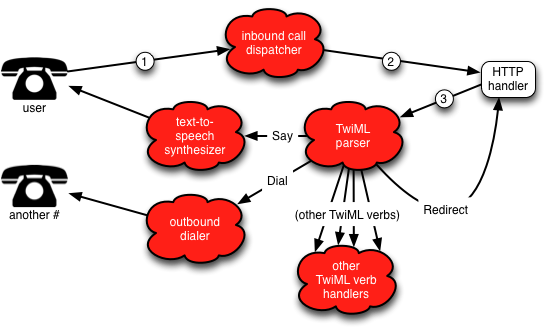 (This diagram is not an official Twilio diagram; it merely describes the author’s mental model of how Twilio works and may differ wildly from Twilio’s actual implementation.)
-
The caller dials (or sends an SMS to) “555-867-5309” on their phone–this is your Twilio sandbox or purchased number. Twilio’s inbound call dispatcher receives the call or text.
-
Once the connection is made, the dispatcher makes an HTTP
GETorPOSTto the Voice or SMS URL specified given for this number. Remember the Voice URL in the Sandbox App of the Twilio Dashboard shown above? That’s the one. For purchased Twilio numbers, you set the voice and SMS URLs under the “Numbers” tab in the Dashboard. -
The Voice or SMS URL specified in the Sandbox App responds to the Twilio request with a TwiML document. Twilio’s TwiML parser reads this document, then executes the “verbs” specified in the TwiML document. For example, if the TwiML document contained a
<Say>verb, Twilio’s text-to-speech synthesizer would “read” the text to the caller. If the document specified a<Dial>verb and number, Twilio would dial the number and connect the caller to it.<Redirect>verbs tell Twilio to fetch another TwiML document.
You may recall an example in the previous article which used Twilio’s voicemail TwiML handler to conduct a brief phone survey. While you can sometimes manipulate third-party TwiML applications to do what you want, TwiML is so simple to use that you’ll find it’s often easier to write your own.
TwiML basics
TwiML is a subset of XML. Here is a TwiML document that when read by Twilio’s parser, will say to the caller, “Foosball at 10 o’clock!” using the text-to-speech synthesizer:
<?xml version="1.0" encoding="UTF-8" ?>
<Response>
<Say voice="man">Foosball at 10 o'clock!</Say>
</Response>
Some TwiML verbs are nestable:
<?xml version="1.0" encoding="UTF-8" ?>
<Response>
<Gather action="/menu.cgi" numDigits="1" method="GET">
<Say voice="man">
Ping pong at high noon!
Hit 1 if you're with me.
Hit 2 if you're a loser.
</Say>
</Gather>
<Say>You must make a choice!</Say>
</Response>
The <Gather> verb tells Twilio to start gathering key presses. Meanwhile, Twilio will hand off the contents of the <Say> verb to the text-to-speech handler. Nesting the <Say> inside of the <Gather> lets the caller push a key anytime during the <Say> verb to interrupt it and process your choice. The final <Say> element only executes if the <Gather> fails (e.g., the caller doesn’t press a key).
Twilio’s excellent documentation details all of the available TwiML verbs. Armed with a little knowledge, you’re dangerouly close to making something useful.
Simple phone menu
You’ve been asked to build a phone menu system for a young urban professional and his family. The application should accept an incoming call, prompt the caller with a numeric menu, and connect the caller with the number of their choice.
No problem. Start with a simple static TwiML document called menu.xml:
<?xml version="1.0" encoding="UTF-8" ?>
<Response>
  <Gather method="GET" action="/menu_handler" numDigits="1">
    <Say>Press 1 for Ryan</Say>
    <Say>Press 2 for Liz</Say>
    <Say>Press 3 for Jason</Say>
    <Say>Press 4 for Erin</Say>
    <Say>Press 5 for Rachel</Say>
    <Say>Press 6 for Gilligan</Say>
    <Say>Press 7 for Potsie</Say>
  </Gather>
</Response>
You can put this file on the web and update the URL in the “Voice URL” field of the Sandbox section of the Dashboard. Anyone who dials the sandbox number, will hear a Twilio’s text-to-speech voice reading the menu options. Anybody remember the “S.A.M.” speech synthesizer from the mid 80’s (Commodore 64 or Atari 800)? You’ve come a long way, baby!
While this static TwiML file would work, it does mean you’ll have two files to update when a phone number changes. Fix that by consolidating the /menu and /menu_handler “routes” (the Mojolicious word for URL handlers) into a single program to generate TwiML dynamically.
WWW::Twilio::TwiML, briefly
WWW::Twilio::TwiML is a special-purpose XML generator and supports several programming styles. For example, the following two code snippets create this TwiML document:
<?xml version="1.0" encoding="UTF-8" ?>
<Response>
    <Say voice="man">Kilroy was here</Say>
</Response>
Snippet number 1:
my $say = WWW::Twilio::TwiML->new();
$say−>name('Say');
$say−>content("Kilroy was here");
$say−>attributes({voice => "man"});

my $resp = WWW::Twilio::TwiML->new();
$resp−>name('Response');
$resp−>content($say);

my $tw = WWW::Twilio::TwiML->new();
$tw−>content($resp);
print $tw−>to_string;
And snippet number 2:
my $tw = WWW::Twilio::TwiML->new();
$tw−>Response−>Say({voice => "man"}, "Kilroy was here");
print $tw−>to_string;
The second snippet uses a technique called “method chaining”; if you’ve used the jQuery module for Javascript, you may already know how powerful chaining object methods can be in certain contexts. WWW::Twilio::TwiML makes chaining possible because each TwiML verb method is a constructor of another WWW::Twilio::TwiML object.
When you chain TwiML objects like this:
$tw->Response->Say("Eat at Joe'");
The Response object is created as a child of the top $tw object. The Say object is created as the child of the Response object. When the $tw object’s to_string method is invoked, like this:
print $tw->to_string;
WWW:Twilio::TwiML crawls down $tw’s list of children, recursively invoking to_string until the last child. The whole process creates this output:
<?xml version="1.0" encoding="UTF-8" ?>
<Response>
<Say>Eat at Joe'</Say>
</Response>
It’s may look a little foreign, but it makes for concise and readable TwiML.
Getting your mojo on
Now that you have a feel for creating TwiML documents, you need a way to serve them from the web.
Mojolicious is an easy-to-use web application framework. Just a few lines and you have a sweet little web app to serve TwiML. Feel free to read a little of the Mojolicious documentation. This author highly recommends going through the Mojolicious::Lite documentation first: almost everything you learn in Mojolicious::Lite also applies to the larger Mojolicious application framework.
To write just enough Mojolicious to do what you’ve already done with the static TwiML document, you need only two modules for this entire application. (Neither has any dependencies–you’re welcome.) Keep in mind that Mojolicious::Lite enables ‘warnings’ and ‘strict’ by default: no sloppy programming allowed!
This application implements a Mojolicious handler for the /menu route which is only called when the application receives an HTTP GET to the /menu URI.
#!/usr/bin/env perl

use Mojolicious::Lite;
use WWW::Twilio::TwiML;

get '/menu' => sub {
    my $self = shift;

    $self->render(format => 'xml',
                  text   => <<'_TWIML_');
<?xml version="1.0" encoding="UTF-8" ?>
<Response>
  <Gather method="GET" action="/menu_handler" numDigits="1">
    <Say>Press 1 for Ryan</Say>
    <Say>Press 2 for Liz</Say>
    <Say>Press 3 for Jason</Say>
    <Say>Press 4 for Erin</Say>
    <Say>Press 5 for Rachel</Say>
    <Say>Press 6 for Gilligan</Say>
    <Say>Press 7 for Potsie</Say>
  </Gather>
</Response>
_TWIML_
};

app->start;
That’s all it takes for a Mojolicious application (source here). Mojolicious packs a full stack HTTP 1.1 web server, making tests easy. In one shell, start your Mojolicious program as a daemon (use Ctrl-c to stop when finished):
$ perl menu_part daemon
[Mon Nov 14 21:41:34 2011] [info] Server listening (http://*:3000)
Server available at http://127.0.0.1:3000.
In another shell, pretend you’re Twilio’s application server and fetch the TwiML:
$ curl http://localhost:3000/menu
<?xml version="1.0" encoding="UTF-8" ?>
<Response>
  <Gather method="GET" action="/menu_handler" numDigits="1">
    <Say>Press 1 for Ryan</Say>
    <Say>Press 2 for Liz</Say>
    <Say>Press 3 for Jason</Say>
    <Say>Press 4 for Erin</Say>
    <Say>Press 5 for Rachel</Say>
    <Say>Press 6 for Gilligan</Say>
    <Say>Press 7 for Potsie</Say>
  </Gather>
</Response>
Is this progress? This is same TwiML as in menu.xml, but now it’s created with Mojolicious. At this point you can upload your app to a publicly accessible server, and, assuming Mojolicious is also installed there, you can start your application. Then go to the Twilio Dashboard and replace the existing Voice URL with:
http://your.server.org:3000/menu
Important note about Mojolicious and HTTP GET
Mojolicious’s get method only responds to HTTP GET method requests. Make sure that when you set the Voice URL in the Twilio Dashboard, you also change the HTTP method to GET. Alternatively, you could use Mojolicious’s post method, which only responds to HTTP POST, or the any method, which accepts both GET and POST (as well as PUT and DELETE), but making Twilio use HTTP GET seems more appropriate.
Putting it all together
Now it’s time to improve the program because it still serves static TwiML. It also needs a programmatic way tell Twilio what to do when the caller presses a key.
Start over and make a hash for the phone menu. This could be put into a separate file–and probably should be–but it wouldn’t be a proper tutorial without something left as an exercise.
#!/usr/bin/env perl

use Mojolicious::Lite;
use WWW::Twilio::TwiML;

my %list = ( 1 => { name => 'Ryan',
                    number => '+19165557720' },
             2 => { name => 'Liz',
                    number => '+19165551211' },
             3 => { name => 'Jason',
                    number => '+19285550122' },
             4 => { name => 'Erin',
                    number => '+19285551729' },
             5 => { name => 'Rachel',
                    number => '+18015553992' },
             6 => { name => 'Gilligan',
                    recording => 'http://www.televisiontunes.com/'
                              .     'themesongs/Gilligans%20Island.mp3' },
             7 => { name => 'Potsie',
                    recording => 'http://www.televisiontunes.com/'
                              .     'themesongs/Happy%20Days%20-%20Season%202.mp3' },
           );

get '/menu' => sub {
    my $self = shift;
This should looks mostly familiar so far. Now create $msg which holds all of the text you want Twilio to “Say” to the caller:
    my $msg = join '. ',
      map { "Press $_ for $list{$_}->{name}" }
        sort keys %list;
It’s time to build the TwiML document, and this could use some error handling in case the caller doesn’t press a key. Finally, print everything via Mojolicious’s render() method:
    my $tw   = WWW::Twilio::TwiML->new();
    my $resp = $tw->Response;
    $resp->Gather({action    => $self->url_for('/menu_handler'),
                   method    => 'GET',
                   numDigits => 1})
         ->Say({voice => 'woman'}, $msg);

    $resp->Say("You need to make a choice or hang up.");
    $resp->Redirect("/menu");

    $self->render(format => 'xml',
                  text   => $tw->to_string);
};
Remember to start Mojolicious’s event loop; this code should always go at the end of your application, as it never returns:
app->start;
(Source here). If declarative-style programming is new to you, don’t fret: under the hood, Mojolicious simply creates a map for itself that says “when I receive an HTTP GET for ‘/menu’, I should execute this subroutine”. The app->start routine begins a loop that waits for said request, then handles it as you’ve defined (declared) it.
The menu handler route
Most of the hard work is done now. As specified in the Gather’s action attribute above, when the caller presses a key, Twilio will perform an HTTP GET on /menu_handler. Add one more Mojolicious route:
get '/menu_handler' => sub {
    my $self   = shift;
    my $choice = $self->param('Digits') || 0;

    my $tw     = WWW::Twilio::TwiML->new();
    my $resp   = $tw->Response;

    unless( exists $list{$choice} ) {
        $resp->Say({voice => 'woman'},
                   "Sorry, that's not a valid option.");

        $resp->Redirect({method => 'GET'}, "/menu");

        $self->render(format => 'xml',
                      text   => $tw->to_string);
        return;
    }
Twilio always passes a Digits parameter to URLs it fetches as a result of a Gather action (see Twilio’s Gather verb documentation); Digits contains the digit or digits pressed by the caller. HTTP GET (and POST) parameters are available to Mojolicious through the param() method.
The code then checks to see if the option the caller has selected exists. If it doesn’t, it generates a TwiML response to tell Twilio to Say to the caller “Sorry, that’s not a valid option.” then sends a redirect back to the main menu.
It’s polite to let the caller know what’s going on, so add a status message:
$resp->Say({voice => 'woman'},
           "I'll try connecting you now.");
Remember that all this code does is build the TwiML response object; only when the complete, stringified TwiML object is sent to Twilio’s application server does the document have any effect on the application flow.
The next step is to look up the caller’s choice in the %list hash. If the caller’s selection had a phone number associated with it, create a Dial, Play, or Say TwiML object, depending on whether %list specifies a number to call, a URL to an audio file to fetch and play, or neither (respectively):
    if( $list{$choice}->{number} ) {
        $resp->Dial($list{$choice}->{number});
    }

    elsif( $list{$choice}->{recording} ) {
        $resp->Play($list{$choice}->{recording});
    }

    else {
        $resp->Say({voice => 'woman'},
                   "Sorry, that option isn't working.");
        $resp->Redirect({method => 'GET'}, "/menu");
    }
Finally, invoke Mojolicious’s render() method to create an XML Content-type header and send the stringified TwiML object to stdout (which Twilio’s application server will read):
    $self->render(format => 'xml',
                  text   => $tw->to_string);
};
Here is the full source for your enjoyment. If you’ve already set Twilio’s Voice URL in uour Sandbox, nothing further needs to be done on Twilio’s side. Just upload the new application to the web server and start it (Mojolicious supports a variety of deployment options including Morbo, CGI, FastCGI, or Plack).
You’ve made a simple phone menu here, but you’ve only learned a few of Twilio’s TwiML verbs. With WWW::Twilio::API, WWW::Twilio::TwiML, and Mojolicious you can also create conference rooms, make voice recordings, send and receive SMS messages, reject calls from unwanted numbers, and do other useful actions in just a few lines of code.
Tags
Feedback
Something wrong with this article? Help us out by opening an issue or pull request on GitHub

